About JWT mappings
A JSON Web Token (JWT; pronounced ‘jot’) is an open standard (RFC 7519) that defines a compact and self-contained way for securely transmitting information between parties as a JSON object. This information can be verified and trusted because it is digitally signed. If Trust Protection Foundation trusts the certificate used to sign the JWT, it trusts the identity information (claim) provided in the JWT.
JWT mappings are a way to tell Trust Protection Foundation which issuers to trust, and how to map identity information in the claim to identities in Trust Protection Foundation. This is a crucial part of the authentication process.
In addition to the general JWT mappings, you can also map Active Directory (AD) accounts to a JWT. This involves adding the AD user to the access management API integration and configuring the Access Management Snapin on either an admin’s workstation or the Trust Protection Foundation server. After these steps, you will be able to map to AD users when setting up a JWT mapping.
JWT Mappings operate in tandem with the central proxy configurations set at the root of the Platforms tree. See About using an HTTP proxy.
Want to know more? Learn about JSON web tokens in this Wikipedia article. Equivalent functionality is available in the WebSDK. See OAuth JWT mapping endpoints for details.
JWT mappings tell Trust Protection Foundation which issuers to trust, and how to map identity information in the claim to identities in Trust Protection Foundation.
Map AD Accounts to JWT
Mapping Active Directory (AD) accounts to a JWT mapping involves the following steps:
Method 1: Use an Admin's workstation
-
Add the AD user to the access management API integration.
-
Install RemoteMmc-26.1.msi on the Admin's workstation.
-
Launch mmc.exe and add the Access Management Snapin.
Method 2: Use the Trust Protection Foundation Server
-
Add the AD user to the access management API integration.
-
Launch mmc.exe on the Trust Protection Foundation server.
-
Add the Access Management Snapin.
After following either of these methods, you will be able to map to AD users when setting up a JWT mapping.
Add a new JWT mapping
-
In the CyberArk Configuration Console or the Access Management snap-in, click the JWT Mappings node.
-
In the Actions panel, click Add New Mapping....
-
Provide the details for the JWT mapping you would like to add.
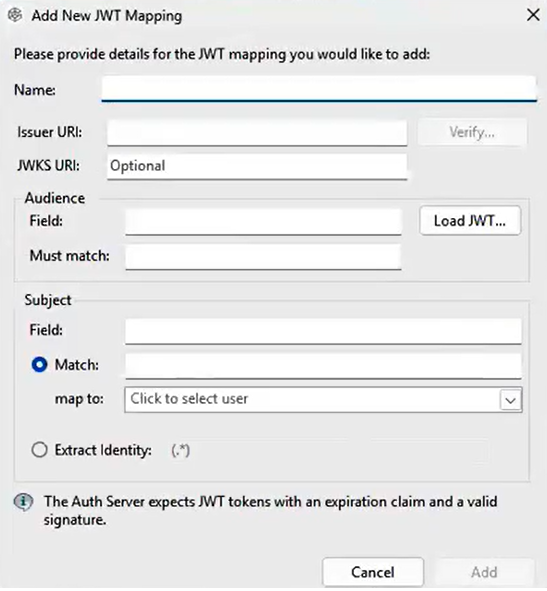
Name Description
Name The name of the application
Issuer URI The Issuer URI to be trusted for this mapping
JWKS URI JWKS URI is optional; leaving it empty uses the standard OIDC discovery flow.
-
If the issuer URI and JWKS endpoint are at different locations (common in Kubernetes and microservices), specifying JWKS URI is necessary to bypass standard OIDC discovery and fetch keys directly.
-
Only one JWKS URI can be used per issuer. All mappings for the same issuer must use the same JWKS URI or none at all.
-
The JWKS URI must use HTTPS.
-
The token’s issuer claim must match the configured issuer URI.
-
Keys are cached per issuer, not per mapping, so inconsistent JWKS URIs for the same issuer will cause errors.
(Audience) Field The name of the JWT field indicating the audience.
You can click the Load JWT button if you want to paste in an existing JWT to automatically set these values.
(Audience) Must Match The value that the audience field must match for the token to be accepted.
(Subject) Field The name of the JWT field indicating the identity owning the token
(Subject) Extract identity The regular expression to use to obtain the identity from Subject > Field. The first group matching the expression is used to determine the identity.
(Subject) Map to Select an identity for a token issued for this mapping.
NOTE This field is evaluated as a RegEx (regular expression), not as a string.
-
-
Click Add.
Edit an existing JWT mapping
-
In the CyberArk Configuration Console or the Access Management snap-in, click the JWT Mappings node.
-
Click on a JWT mapping in the list.
-
In the Actions panel, click Properties.
-
Modify the JWT's mapping settings, as desired.
A table with descriptions for each filed is available in the previous section.
-
Click OK.
Delete a JWT mapping
-
In the CyberArk Configuration Console or the Access Management snap-in, click the JWT Mappings node.
-
Click on a JWT mapping in the list.
-
In the Actions panel, click Delete....
-
[Conditional] If a confirmation modal appears, click Yes.