Creating an Azure Key Vault application object
To store certificates, an Azure Key Vault application object must be created in Trust Protection Foundation. Then, in Azure, the Service Principal must be granted the required permissions to manage certificates.
You can also configure Trust Protection Foundation to bind your certificates to web applications automatically during provisioning so that you don't have to create the binding using other methods.
TIP If you plan to bind certificates to a web application, make sure that you've set up your web application already before you complete the following procedure.
To create an Azure Key Vault application
- In Policy Tree, click the Azure policy that you created earlier.
- Find the Azure device that you created under the Azure policy.
- Highlight the device and then right-click it.
-
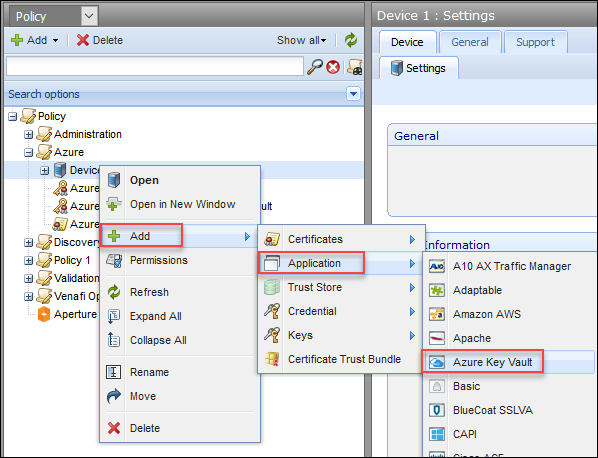
Choose Add > Application > Azure Key Vault.

-
Under Certificate, for Associated Certificate, click
 to find the certificate that you want to associate with the Azure Key Vault application.
NOTE You can enable only one associated application per remote key generation. To see the differences between the two methods of private key generation, see Supported methods of key generation
To enable remote key generation:
- Click the certificate name to open the certificate.
- In the certificate's Settings tab, under CSR Handling, set Generate Key/CSR on Application to Yes.
-
In Application Information, do the following:
- In the Application ID field, type the application ID of the Azure Service Principal.
- Click Certificate Credential to select the required credential.
- In Installation Settings, do the following:
- In Azure Key Vault Name, type the name of your key vault.
In the Certificate Name field, type the name of the certificate that is going to be used for tracking the certificate in the Azure Key Vault.
NOTE The Certificate Name is automatically generated from Certificate Common Name (or DNS SANs if you don't specify a name).
If you do specify a name, dots are changed to hyphens.
Example: dsmith.denver.sales is converted to dsmith-denver-sales. Also, special characters are not allowed in the name and are removed.
TIP When you provision a new certificate to Azure Key Vault using a certificate name that is already in use, Azure automatically updates any existing bindings to that certificate name. However, they won't likely be activated as quickly as the bindings that are configured to be updated using the driver.
- (Conditional) If you want Trust Protection Foundation to extract certificates and private keys from Azure Key Vault, set Private Key Exportable to Yes.
- Use Chain Order to select the order of the certificate chain, with options such as Root first and End-entity first.
-
(Conditional) If you want to bind certificates to web applications, then in the SSL Settings box, do the following:
- Set Bind Certificate to Web Application to Yes.
- In the Web Application Name field, type the name of the web application to which you want to bind certificates.
-
(Optional) A subscription ID is only required if the web application to be bound is in a different subscription than the specified key vault. Enter the subscription ID of the web application.
- If a binding doesn’t exist already, set Create New Binding to Yes.
-
Set Create/Update binding for each DNS SAN to No if you only want to create/update a specific FQDN.
If you select No here, you'll enter a single hostname in the Specify Binding Hostename(s) field (described below). Select Yes if you want Trust Protection Foundation to automatically create/update one binding for every DNS SAN in the certificate.
- Click the SSL Type field and select whether to use SNI or IP Based.
- In Specify Binding Hostname(s) , type one or more hostnames.
-
When you're done, click Save.
You'll need to create an Azure Active Directory that includes App Registration and Service Principal. Refer to Azure's product documentation for instructions.
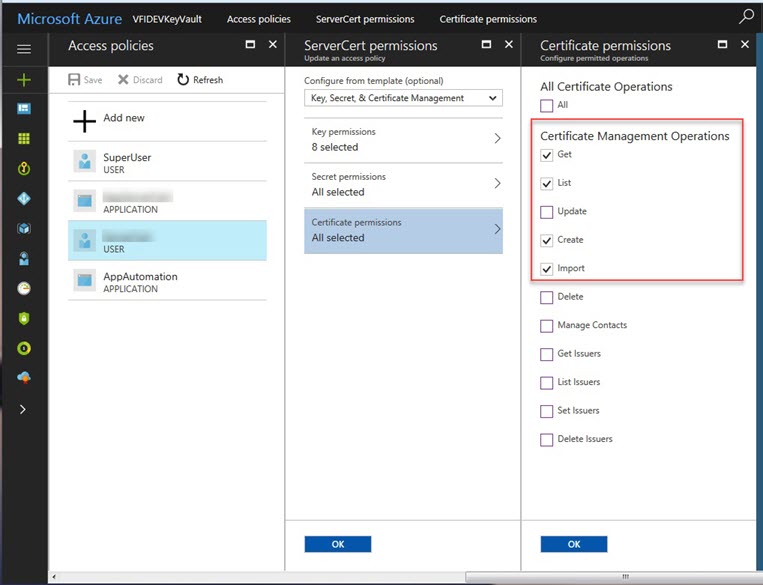
In the Azure Key Vault, the Service Principal must have the Get, List, Import, and Create certificate permissions.
