Custom Views
The Event Viewer snap-in allows you to create, save, and share custom views. All created custom views are automatically saved under the Trust Protection Foundation user’s preferences on the Trust Protection Foundation server associated with the query.
Create a new Custom View
To create a new Custom View, click Create Custom View from the Action Panel on any Event Detail View (or right-click an Event Detail node).
NOTE Saved views are saved to your Trust Protection Foundation user preferences. As such, saved views are available on any system where you use the snap-in against the same Trust Protection Foundation server using the same user credentials.

The snap-in will display the Create Custom View dialog, which allows you to select the timeframe or age of events, the Event level (Severity), as well as the applications and specific Event IDs.
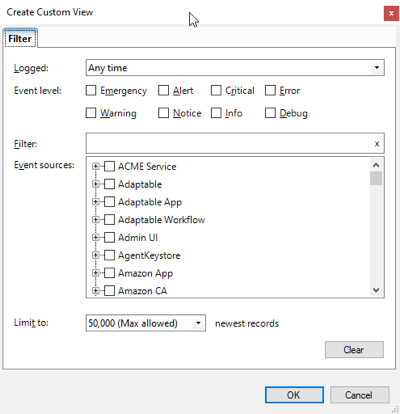
Select timeframe
From the Logged drop-down, select a timeframe for this view.
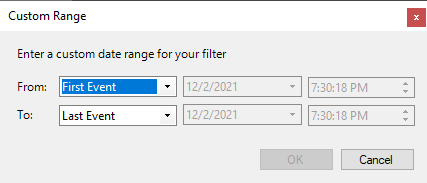
To chose a specific date range, select Custom range, and the snap-in will display the Custom Range dialog, allowing you to narrow the range.
First Event represents the oldest event. Last Event represents the newest event. To pick a specific start or end date, select Event On from either drop-down.
Select filter criteria
Select one or more of the Event levels. Then, use the Event sources box to select the events that you want to include.
TIP Use the Filter field to quickly search the event sources options. Start typing the name of any event source, and the list will filter based on your entry.
Save the custom view
After choosing your filter criteria, click OK to get the Save Filter to Custom View dialog. In this dialog, you can provide a name and description for your new view, and you can create and choose what folder to save your view under.

For OK to be enabled, at a minimum you must provide a name and select a folder. In this example, we used the New Folder button to create the My View Folder to save the new view under.
Once saved, the new view is immediately loaded and displayed.
Edit an existing Custom View
To make changes to an existing view, select the view node and click Filter Current Custom View in the Actions Panel.
Save and open event logs
To save a current log, click Save Events Log As in the Actions panel. This exports the current log in CSV format.
To open a previously-saved log, click Open Saved Log and select the log you want to import.
Import and export views
To export your current view to a JSON file, select a folder (not a saved custom view) in the navigation panel. Then, in the Actions panel, click Export Views. From here, you can select what views you want to export.
TIP The Export Views feature is best used for sharing views with other users, or for copying views from one environment to another (such as from dev to production).
Saved views are automatically available from any machine where you add the snap-in against the same Trust Protection Foundation server using your same credentials.
The JSON file that is saved when a view is exported can subsequently be imported on another machine. Click on a folder in the navigation panel, and then click Import Views, and select the previously-exported JSON file.