Entitlement report
NOTE This report is available only in .csv format.
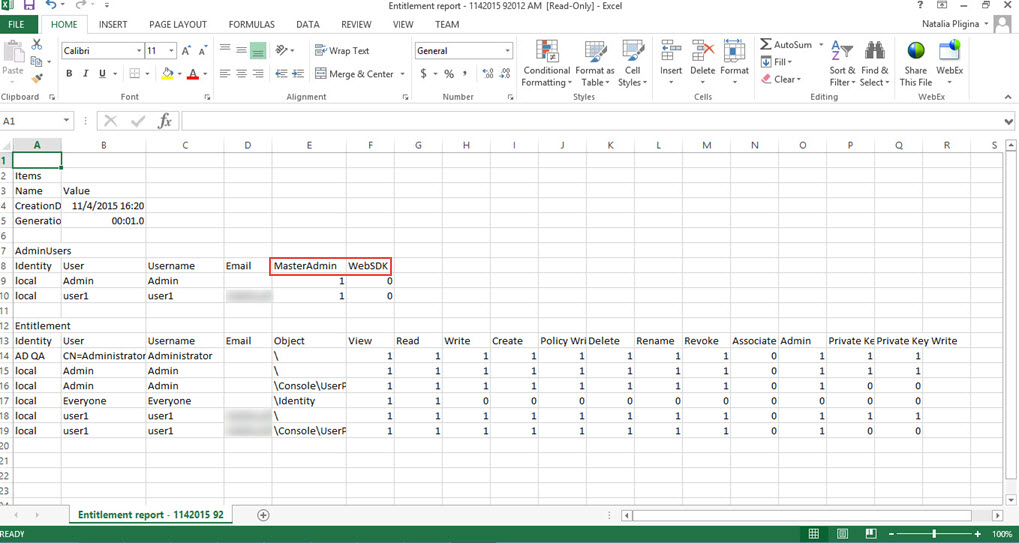
The Entitlement Report shows all users that have access to the encryption management system. The report displays the following information for each user:
- User’s Identity store
- Name of the user
- Name of every object in the encryption system the user has permissions to
- Each permission the user has to the object
- Users that have Master Admin or WebSDK Access
Sample of the Entitlement Report

|
Field |
Description |
|
Settings tab |
Defines the report format and delivery options. |
|
|
Queues the current report with the Reporting Module. |
|
|
Downloads the most recent run of the current report in the available format. When the Reporting module runs a report, it archives the latest version of the report in the format designated in the Report object configuration. To download a report
|
|
Scheduler |
|
|
Last report generated on |
Date and time the report was last generated. |
|
Next Run |
Next date and time the Report engine is scheduled to generate the report. The Next Run date and time is a guesstimate. Moreover, it happens only if the Reporting Module is enabled. |
|
Settings |
|
|
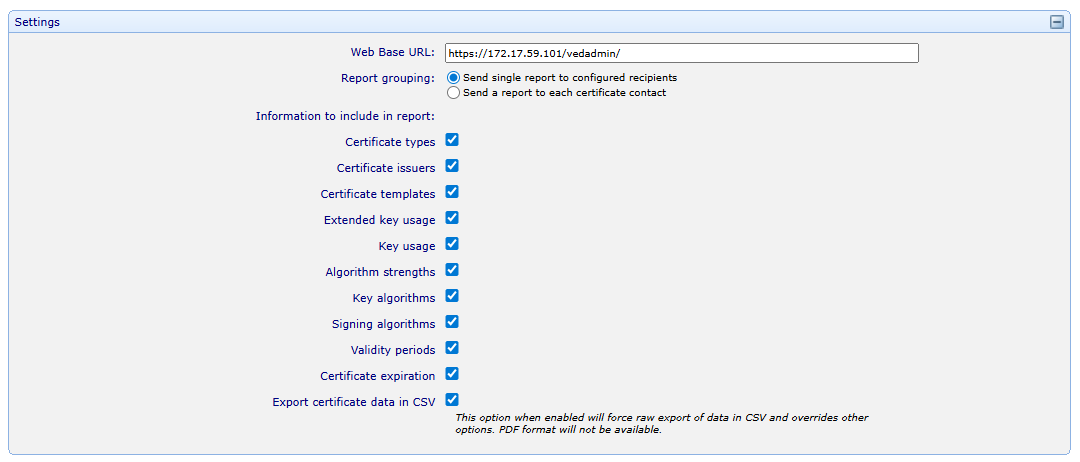
Web Base URL |
The URL that will be used when creating hyperlinks in the PDF report. All URLs will contain this base. |
|
Report grouping |
Send single report to configured recipients sends the report to the recipients specified in the Setup & Delivery tab. Send report to each certificate contact sends an individual report of assets to each certificate contact. |
|
Information to include in report |
Certificate data can be exported in CSV formal that provides raw data about certificates, including key algorithms, signature algorithms, process logs and so on. |
|
Filters |
|
|
Only include the following contacts |
This filter is available on reports for managed certificates. When contacts or groups are selected here, certificates that don't belong to those users or groups will be omitted. |
|
Only report on the following containers |
Select containers to report on. |
|
Customize explanatory text |
|
|
Explanatory text |
Customizable text that appears at the top of the PDF report. |
|
Statement of corporate policy (Optional) |
Customizable, optional text that appears at the end of the PDF report. Your corporate policy pertaining to the information being presented can be shown here. |
|
Setup & Delivery tab |
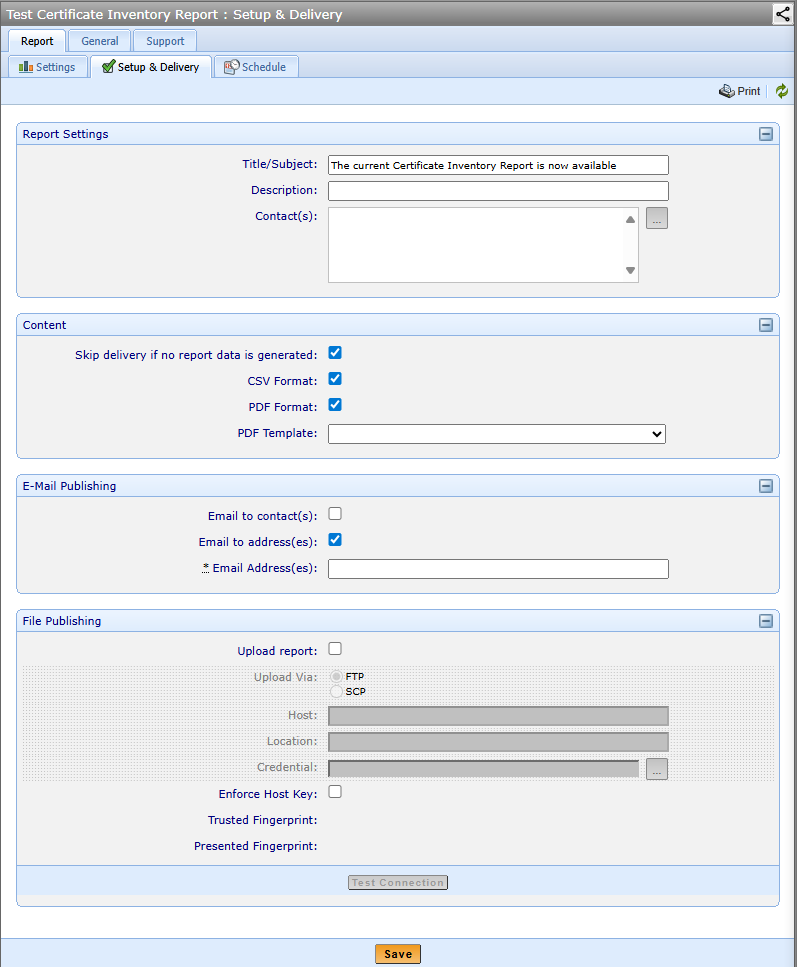
Defines the report format and delivery options.
|
|
Report Settings |
If you choose Discovered Certificates, you can also choose to include or exclude hidden results. If you choose Managed Certificates, you can also choose to include disabled certificate objects. |
|
Include Root Certificates |
Certificates that are listed as part of a Certificate Authority template object or certificates that are in the Roots tree. |
|
Include disabled or hidden results |
See the row Entitlement report . |
|
Disable Certificate Details |
If you choose this, a table containing details about the certificates on the report won't be displayed. |
|
Selected folders |
Select the objects you want included in the report. |
|
Email Publishing |
The Email Publishing configuration enables the Reporting module to email the report to the designated recipients each time the Report engine generates the report. The Report module can send PDF only, PDF and CSV, or CSV only versions of the report. If no report format is selected, Trust Protection Foundation sends a CSV report. The SMTP Host is defined in the platform settings in Policy Tree. |
|
Send To |
Emails the report to the designated recipients. |
|
Contact |
Emails the generated report to the Report object’s contact identities. If the Contact is one or more user identities, the Reporting module emails the report to every listed user. If the Contact is a group, the Reporting module emails the report to every member of the group. |
|
Address |
Emails the generated report to the designated email addresses. You can delineate multiple email addresses with a comma. |
|
File Publishing |
The File Publishing configuration enables the Reporting module to upload the report to a designated location each time the Report engine generates the report. The default filename for the report file is Report_Title-yyMMdd-HHmm.extension or Report_Title-yyMMdd-HHmm.-subtitle.extension. For example: CyberArk Trust Protection Foundation Licensing Report-100726.pdf. This filenaming convention prevents overwriting the previous report, particularly if the report is generated on an hourly schedule or you generate multiple copies of the report during the same report run. |
|
Upload via FTP or SCP |
Designates the protocol you want to use to upload a report to the designated location. |
|
Host |
IP address or hostname of the computer where you want to upload the report file. Trust Protection Foundation recognizes both IPv4 and IPv6 addresses. |
|
Location |
Directory where you want to upload the report file on the designated host. The designated directory must already exist on the host. |
|
Credentials |
Credentials required to authenticate with the designated host. The account used to authenticate with the host must have permissions to write the report file to the designated directory. |
|
Test Connection |
Attempts to connect to the specified host and create a file in the specified directory. If the test is successful, the file that is created is deleted automatically. |
|
Schedule Tab |
The settings on the Schedule tab are additive. If you define Day, Week, and Month options, the effective schedule is an aggregate of all the settings. Take care in defining your report scheduling options. It is possible to configure the schedule so the report is never generated. |
|
Time of Day |
|
|
Manual |
Runs the report only when you click |
|
Hourly |
Runs the report every hour. |
|
But only between ___ and ___ |
Allows you to narrow the Hourly run cycle to specific hours in the day (for example, every hour between 8:00 a.m. and 5:00 p.m.). Tip: If you want the final hourly report to run at 5 p.m., then specify the final run time as 5:01 p.m. |
|
Daily |
Runs the report every day at the designated hour. |
|
Day of Week |
|
|
Run only on |
Run the report on the designated days. |
|
Day of Month |
|
|
Run only on day |
Specific days of the month you want the report to run (for example, the first and seventh days of every month). |
|
General Tab |
|
|
Log Tab |
Provides a view of all events triggered for the current object. An administrator must have a minimum of the Read permission to view this tab. |
|
Permissions tab |
On the Permissions tab, you select the users or groups to whom you want to grant permissions to the current object. Then, you select which permissions you want the users or groups to have. You can also manage object permissions via parent objects, including the root Platform object or the Trust Protection Foundation server object (found in the Platforms tree). If you configure Permissions in a parent object, those permissions are inherited by all subordinate objects. |

