Setting up AuthZHelper and SSH Key Authorization Rules
This topic explains how to install, configure, and authenticate AuthZHelper so administrators can use Trust Protection Foundation (TPF) and SSH Manager for Machines to manage SSH activity with SSH key authorization rules. See SSH Key Authorization Rules and AuthZHelper
Use this topic when you are ready to deploy AuthZHelper on your systems. These steps help you prepare your environment, configure SSH, install AuthZHelper, and confirm it is working. Each step depends on the previous step. Completing all steps ensures AuthZHelper is installed correctly and TPF can track and report SSH key authorization rules.
-
Step 1: Design your system for AuthZHelper
-
Step 2: Meet system requirements for AuthZHelper
-
Step 3: Set up AuthZHelper users
-
Step 4: Prepare Linux environment for AuthZHelper
-
Step 5: Configure SSH for AuthZHelper
-
Step 6: Install AuthZHelper on Linux distributions
-
Step 7: Configure SELinux for AuthZHelper (RHEL only)
-
Step 8: Review the setup after installing AuthZHelper on Linux (any distribution)
-
Step 9: Authenticate AuthZHelper
-
Step 10: Troubleshoot AuthZHelper setup
After you complete these steps, AuthZHelper is ready to use. You can then monitor and enforce SSH key authorization rules by following the instructions in Managing and monitoring SSH Key Authorization Rules.
Step 1: Design your system for AuthZHelper
To control SSH access and to populate SSH key authorization rules in Trust Protection Foundation (TPF), you must design and implement AuthZHelper correctly.
-
Use both traditional SSH agent and AuthZHelper tools.. The most secure deployment of SSH Manager for Machinesincludes configuring and managing machines through traditional SSH agent and agentless tooling in addition to using AuthZHelper. Combining both technologies provides robust discovery, remediation (key rotation), trust mapping and authorization tracking.
-
Design your architecture. Identify device groups, proxy requirements and connection state. Each machine must be configured to communicate with TPF to track SSH key authorization rules.
Host machines that use AuthZHelper must follow a local-policy approach. They must trust the authorized keys specified in their configuration file, even if they cannot connect to TPF. This behavior is intentional and ensures that SSH access is not disrupted during network outages or connectivity issues.
-
Design your deployment.: You can deploy the AuthZHelper utility passively with Ansible or other orchestration tools. A sample playbook is provided in the download package and is also available from CyberArk Customer Support and Professional Services.
For best results, deploy AuthZHelper in groups that align with your strategic objectives. Each group can be rolled out separately, allowing you to assess performance and impact. On the backend, every machine receives a unique identifier that is used for applying authorization rules.
-
Deploy, test and monitor: Deploy the AuthZHelper utility to your initial device group and verify that it is functioning as expected. Detailed deployment steps are provided later in this topic, but in summary, deployment involves:
-
Install, configure and authenticate AuthZHelper.
-
(Optional) Set up advanced configuration for TrustedUserCAKeys or Authorized Principals.
-
Update the sshd_config file to use only AuthZHelper for authentication. Verify and restart the service.
-
Monitor and report on authorizations through TPF.
After deployment, you should monitor the system to ensure proper operation before proceeding to additional device groups.
-
-
Create reports and set up alerting: Once SSH key authorization rules are being routed through AuthZHelper and Trust Protection Foundation, administrators can view and generate reports showing which SSH keys are being used to access host devices and under which principal (user or service account). See Managing and monitoring SSH Key Authorization Rules.
Step 2: Meet system requirements for AuthZHelper
When setting up SSH Manager for Machines with AuthZHelper and the SSH Key Authorization Rules features, you should consider the following:
-
As of TPF version 25.3, you should have a dedicated TPF instance to accommodate SSH Manager for Machines. This is due to increased overhead related to SSH authorization frequency.
-
When using the SSH Key Authorization Rules feature, note that Agentless Discovery may incorrectly report authorized keys when AuthZHelper is enabled. This is because AuthZHelper uses its own configuration to specify the locations of authorized keys files, which may differ from the locations that the agent scans. As a result, the agent may not detect authorized keys managed by AuthZHelper, leading to discrepancies in reported key data.
In a standard scenario, AuthZHelper and Agent(less) use a known folder (for example, /home/%u/.ssh/) and point to the same AuthorizedKeys file.
-
Because SSHD is configured with AuthorizedKeys set to
nonewhen using AuthZHelper, the agent does not detect any authorized keys. Instead, AuthZHelper uses its own config.yaml to identify authorized keys, which can cause keys to appear mis-labeled or appear as public keys. -
AuthZHelper instances use a copy of the TPF server's TLS certificate to authenticate. This should be manually added to the AuthZHelper client’s config folder and can be monitored and rotated through TPF. Alternatively, if TPF is using a certificate that is trusted by the client’s OS, then the api-cert reference is not needed.
-
AuthZHelper is not compatible with the ‘match’ option in SSHD. If your organization uses this configuration, we recommend consulting with the Palo Alto Networks Professional Services team before installing or modifying your sshd_config.
-
SSH connection ‘Options’ (see SSH Manager > Options) will be passed to AuthZHelper and then to SSH. This follows the SSH code flow in that options are added together as they are encountered (for example from TrustedUserCAKeys, then again from AuthorizedPrincipalsFile). If there are conflicting options, AuthZHelper will deny the connection and log an entry saying “Conflicting options detected”.
-
Known conflict: If a user has configured their authorized_keys file with conflicting SSH options (i.e. no-port-forwarding with
permit-listen="[HOST]:PORT"), the default behavior of SSHD is to reconcile the options, generally preferring the most restrictive result. However, some combinations are considered invalid by SSHD (i.e. multiple command= options). Any of these invalid combinations will result in a failed login attempt by SSHD. In these cases, SSH Manager reflects an "observed" rule, indicating that the account does have access to the host. This choice was made to show all potential accesses in the ruleset even if SSHD would ultimately deny those attempts due to the user's misconfiguration of authorized_keys.
Supported distributions for AuthZHelper
| OS family | Distribution / OS name | Latest OS version | BASH version | Open SSL (min) | OpenSSH (min) | Open SSH V (current) | Notes |
|---|---|---|---|---|---|---|---|
| Linux | Ubuntu (server) | 24.04 LTS | 5.2.15 | 3.0+ | 9.6p1 | 9.9p1 | |
| Debian | 12 (Bookworm) | 5.2.15 | 3.0+ | 9.6p1 | 9.2p1 | Limited support | |
| Debian | 13 Trixie | 5.2.37 | 3.5+ | ||||
| Fedora | 40 | 5.2.26 | 3.0+ | 9.6p1 | 9.8p1 | ||
| Arch Linux | Rolling release | 5.2.x | 3.0+ | 9.6p1 | 10.0p1 | ||
| CentOS Stream | 9 | 5.1.8 | 3.0+ | 9.6p1 | 8.7p1 | Limited support | |
| Alpine | 3.21 | 5.2.15 | 3.0+ | 9.6p1 | 10.0p1 | ||
| RHEL | 10 | 5.x | 3.0+ | 9.6p1 | 9.9 | ||
| RHEL | 9 | 5.x | 3.0x | 9.6p1 | 8.7p1 | Limited support | |
| Unix | AIX | 7.2 | 5.1.4 | 3.0+ | 9.6p1 | 9.3p2 | Limited support |
| HP-UX | 11i v3 | 4.3.33 | 3.0+ | 9.6p1 | 9.3p2 | Limited support | |
| Solaris | 11.4.81 | 5.2.37 | 3.0+ | 9.6p1 | 9.9p2 | ||
| FreeBSD | 13.5 | 5.2.15 | 3.0+ | 9.6p1 | 8.7p1 | ||
| Windows NOT SUPPORTED Included here for informational purposes only. |
Windows Server
|
2022 | 5.2.15 | 3.0+ | 9.6p1 | 9.5 |
AuthorizedKeyCommand is NOT supported by default.
|
Technical reference
-
The
AuthorizedKeysCommandfeature was introduced in OpenSSH 8.0p1, released in March 2013. For full functionality, version 9.6p is required. -
The currently-supported flags include:
-
%u— expands to the username being authenticated. -
%h— expands to the home directory of the user. -
%t— expands to the key type. -
%f— expands to the fingerprint of the key. -
%k— expands to the base64-encoded key.
-
-
When updating sshd_config in RHEL do not update
UsePrivilegeSeparation. See Chapter 12. OpenSSH | System Administrator’s Guide | Red Hat Enterprise Linux | 7 | Red Hat Documentation.
Step 3: Set up AuthZHelper users
Before deploying AuthZHelper, you should create dedicated user accounts for each AuthZHelper instance or group. These users must be granted the necessary permissions within Trust Protection Foundation (TPF) to enable secure integration and management.
The following outlines how to create and configure these users, ensuring your AuthZHelper deployment is properly authorized and ready for installation.
-
Create dedicated user accounts or groups specifically for AuthZHelper instances.
-
Assign the Platform/API/Integrations > CyberArk AuthZHelper permission to these users.
-
To create a new user:
-
Navigate to SSH Manager > Policy Tree > Identity > Local in TPF.
-
After creating the user, assign API permissions under Platform > API > Integrations > CyberArk AuthZHelper.
-
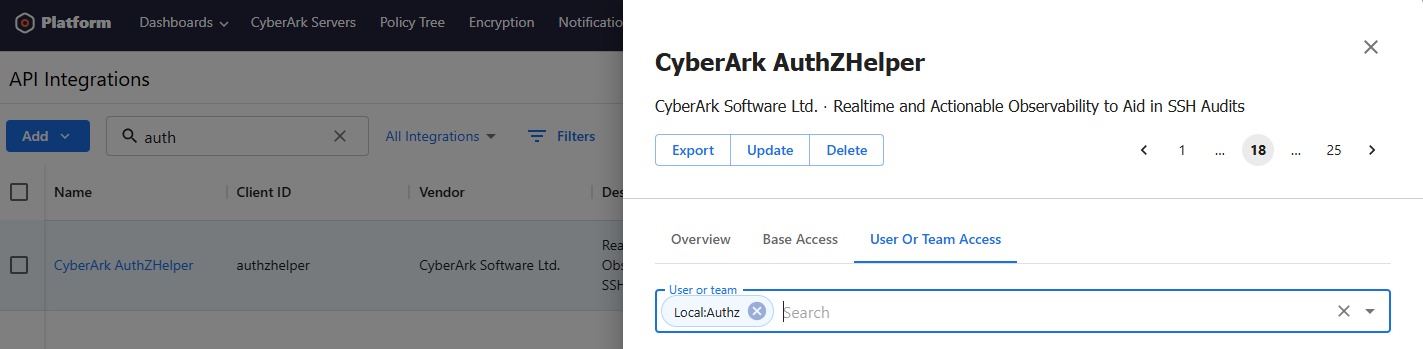
Recommended OAuth settings for AuthZHelper users
-
Running a supported version of SSH Manager .
-
Access to the TPF server through the browser-based Admin Console or direct access to the Windows Server console running TPF.
-
Ability to deploy AuthZHelper to Linux hosts.
-
Hosts can reach TPF directly or through a proxy.
-
Ability to use Ansible or another orchestration tool for deployment.
AuthZHelper command line reference
Usage:
authzhelper [command]
Available Commands:
authenticate - Authenticate authzhelper to the tpp
authorize - Perform authorizations of SSH key or certs
help - Help about any command
Flags:
-d, --debug Enable debug mode
--help
-l, --log string Log output file
-v, --version Display CLI version information
Use "authzhelper [command] --help" for more information about a command.
When Trust Protection Foundation (TPF) is properly configured, users are set up, and you have identified your target systems for AuthZHelper deployment, you can proceed to distribute the AuthZHelper files and authenticate the utility.
Step 4: Prepare Linux environment for AuthZHelper
NOTE You should deploy AuthZHelper in a test or lab environment first before moving to production. You should also work with Palo Alto Networks Professional Services team for planning, deployment, and preparing SSH authorization audits.
Recommendations and prerequisites
- Before you begin: Review Supported distributions for AuthZHelper when planning your target groups for AuthZHelper. Make sure that all functions are supported and that network access is possible.
-
To quickly obtain and save the TPF server's TLS certificate, you can run the following command, using your Trust Protection Foundation endpoint FQDN in place of
TPF.local:openssl s_client -connect TPF.local:443 -showcerts </dev/null 2>/dev/null | awk '/BEGIN CERTIFICATE/,/END CERTIFICATE/ { print $0 }' > /var/opt/cyberark/sshmanager/ca-cert.pem
Modifying this command and applying it to cron or similar tasks can assist with automating certificate renewals.
-
Consider the impact of DNS changes. Consider setting static host locations for TPF via
/etc/hostson each AuthZHelper client. The AuthZHelper configuration will rely on an FQDN that is resolvable to TPF and matches the FQDN of the TLS certificate. -
In the event of a misconfiguration, you may not be able to connect to a host via SSH. You should proceed with caution and review console access options before deployments.
-
For large scale deployments, Ansible Playbook is available through the Palo Alto Networks Support Team.
Recommended file hierarchy
-
Binary:
/usr/bin/authzhelperNOTE This is the only supported executable path. Do not treat this executable as a directory.
-
Config:
/var/opt/cyberark/sshmanager/config.yml -
TPF Trust Bundle:
/var/opt/cyberark/sshmanager/ca-cert.pemICA/Root must be trusted to support certificate rotation.
-
Authorized keys:
.ssh/authorized_keys .ssh/authorized_keys2This matches the recommended location based on SSHD config. Each user's
/home/%u/.ssh/AuthorizedKeysfile is searched for a matching public key.This location is customizable and accepts variables such as
/export/home/%u/.ssh/AuthorizedKeys. However, if the location begins with%, it will need to be quoted. For example, inconfig.yaml:AuthorizedKeysFile '%u/home/.ssh/authorizedkeys'. -
Machine identity:
/var/opt/cyberark/sshmanager/.authzidThis file contains a unique machine identifier (UUID) that is generated automatically the first time AuthZHelper authenticates. It is used to bind OAuth tokens to the specific machine. Do not edit or copy this file to other machines. Permissions must be
0600. -
Secret:
/var/opt/cyberark/sshmanager/.authzhelper_secretEncrypted OAuth token (AES-256-GCM, 26.2+). Created during authentication. Do not edit or copy. Permissions:
0600. -
System machine ID:
/etc/machine-id(fallback:/var/lib/dbus/machine-id)AuthZHelper reads this file to bind the encrypted token to the specific machine. This file is managed by the operating system. Do not edit it. Permissions must allow read access (
0444).NOTE On Alpine Linux and other non-systemd distributions,
/etc/machine-idmay not exist. AuthZHelper falls back to/var/lib/dbus/machine-idautomatically. In containerized or custom environments, ensure that one of these files exists and is readable before runningauthzhelper authenticate.
Step 5: Configure SSH for AuthZHelper
Do NOT make changes to the SSH configuration or restart the service until you have successfully deployed the AuthZHelper utility. Doing so may lock out SSH access. Make sure to review all deployment instructions before making these changes.
IMPORTANT AuthZHelper defaults to Observability mode. This is a passive monitoring that DOES NOT rely on Trust Protection Foundation for authorization. HOWEVER; without a connection to Trust Protection Foundation, Deny rules and Revoke are not enforced. In high security environments, failure_mode: closed should be used to block authorizations when TPF can not be contacted.
Recommendation and considerations
-
You should create a backup of your sshd_config for referencing later or to restore configurations. This can be done with: cp /etc/ssh/sshd_config /etc/ssh/sshd_config_backup_Authz.
The SSHD configuration should have these values set for the following directives:
PubkeyAuthentication yes #this can be left commented out, defaults to yes.
AuthorizedKeysCommand /usr/bin/authzhelper a -u %u -f %f -h %h -k %k -t %t -C %C -D %D -U %U
AuthorizedKeysCommandUser root
AuthorizedKeysFile none
TrustedUserCAKeys none
AuthorizedPrincipalsFile none
-
If you configure AuthorizedKeysCommandUser to use a non‑root account, that account must have read access to all authorized_keys file locations for every user (typically /home/%u/.ssh/authorized_keys). If it cannot read these files, AuthZHelper will be unable to return any keys to SSHD, and public‑key authentication will be denied for all users.
-
While PubkeyAuthentication defaults to yes, it is explicitly enabled in this configuration for continuity.
-
In this configuration, SSH is configured to not rely on AuthorizedKeys, TrustedUserCAKeys or AuthorizedPrincipalsFile but instead to use AuthZHelper for authorization. Then, AuthZHelper is configured to report the connection to TPF and to use the values set in the config.yaml for AuthorizedKeys, TrustedUserCAKeys or AuthorizedPrincipalsFile.
-
You should review the SSH configuration to ensure that additional conflicting authorization options are not part of the configuration. By default, sshd_config may include configurations in Include /etc/ssh/sshd_config.d/*.conf. (Many providers use this option to re-allow PasswordAuthentication.)
Step 6: Install AuthZHelper on Linux distributions
Consider the following as you install and configure your Linux system files for the AuthZHelper utility:
-
The AuthZhelper tar.gz or rpm file is available through your client download portal.
-
Before running the installation files, make sure they are in a location accessible to the _apt user; such as /tmp.
-
When copying values from sshd_config, if a directive is commented out, the default value will be set.
For example, if sshd-config has AuthorizedKeysFile commented out, it will then be set to check your current AuthorizedKeysFile reference and/or the TrustedUserCAKeys reference.
This is typically part of the /etc/ssh/sshd_config file. You should create backups and local copies for reference. These values will be updated by the installation and referenced in the config.yaml file for AuthZHelper.
Before making changes, the default settings should look something similar to this:
#RSAAuthentication yes
PubkeyAuthentication yes
AuthorizedKeysFile .ssh/authorized_keys
#AuthorizedKeysCommand none
#AuthorizedKeysCommandRunAs nobody
TrustedUserCAKeys /etc/ssh/ca_user_key.pub
#AuthorizedPrincipalsFile /etc/ssh/principals
 Installing on Fedora / RHEL
-
Place the RPM package in a working directory.
-
(Recommended) Check for updates based on your environment, e.g. - rpm update.
-
Install AuthZHelper with
rpm install ./authzhelperXXX. This will update OpenSSH and OpenSSL, and install dependencies.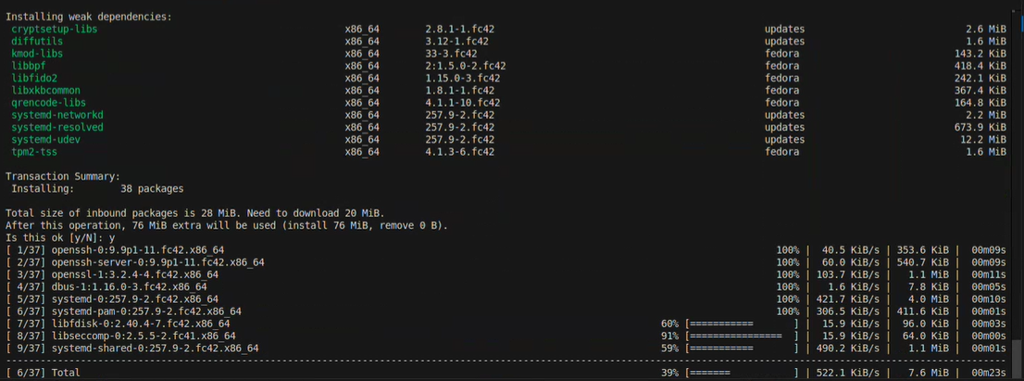
NOTE After installation, the log output will contain the following message:.For configuring AuthZHelper run ./configure.sh in folder /var/opt/cyberark/sshmanager/.
-
Navigate to the
/var/opt/cyberark/sshmanager/directory and run the configuration script with./configure.sh.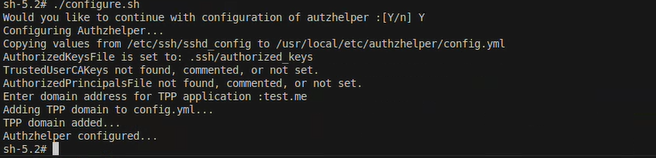
-
Verify the values of the
config.yamlfile. This will be in the same directory.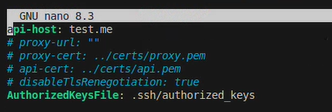
-
Proceed to After installing AuthZHelper on Linux (any distribution).
Installing on Ubuntu / Debian
-
Place the
authzhelperxxx.debfile in your working directory.
-
Update OpenSSL and OpenSSH. The tool will prompt if dependencies are not met.
apt-get update && apt-get upgrade openssh-server -y && apt-get install openssl -y -
Run the installer apt-get install ./authzhelperxxxxx.deb.
-
Upon completion of the installation, you will be prompted to configure AuthZHelper.
-
(Optional but recommended) The configuration will copy values from
/etc/ssh/sshd_configto the AuthZHelperconfig.yaml.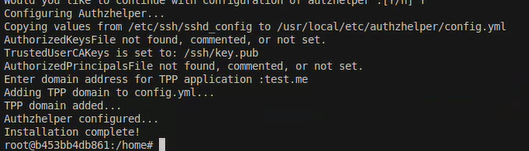
-
Verify the values of the
config.yamlfile in/var/opt/cyberark/sshmanager/authzhelperconfig.yaml.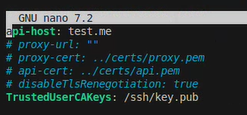
-
Proceed to After installing AuthZHelper on Linux (any distribution).
Installing on other Linux distributions
-
Place the authzhelperxxx.tar.gz file in your working directory.
-
Run tar -xvzf ./authzhelperxxx.tar.gz -C authzinstall

-
Navigate to the install directory cd authzinstall and run the installer ./install.sh with the following optional flags:
optional flags:
--configure // auto-configure authzhelper, based on the /etc/ssh/sshd_config
--api-host //define FQDN of TPF host
The installation script checks for dependencies:

Upon completion of the installation, if no flags are used, you are prompted to configure AuthZHelper. The configuration will copy values from the
/etc/ssh/sshd_configto the AuthZHelperconfig.yaml. -
Verify the values of the
config.yamlfile in/var/opt/cyberark/sshmanager/config.yaml.
Step 7: Configure SELinux for AuthZHelper (RHEL only)
This step ensures that SELinux does not block AuthZHelper on RHEL systems. When SELinux is enabled, additional configuration is required so AuthZHelper can read files and connect to Trust Protection Foundation (TPF).
Complete this step after installing AuthZHelper and before authenticating it.
Why SELinux configuration is required for AuthZHelper
On RHEL systems with SELinux enabled, AuthZHelper runs in the sshd_t domain. By default, SELinux restricts what this domain can access. Without additional SELinux configuration, AuthZHelper may be blocked from:
-
Reading its configuration file
-
Writing identity, secret, or cache files
-
Connecting to Trust Protection Foundation (TPF) over HTTPS (port 443)
When AuthZHelper is blocked, SSH connections may still succeed, but authorization events stop reporting or fail silently. Issues can appear after initial success, for example, the day after installation, when cache or identity files are accessed again.
Completing this step ensures that:
-
AuthZHelper can read and write all required files
-
AuthZHelper can send authorization data to TPF
-
SELinux remains enabled and enforced at the system level
NOTE You do not need to disable SELinux.
Check if this step applies to you
This step applies only if all of the following are true:
-
You are running RHEL 8 or RHEL 9
-
SELinux is enabled on the host
-
You installed AuthZHelper and plan to authenticate it
IMPORTANT If SELinux is disabled, you can skip this step. If you skip this step on a system with SELinux enabled, SSH authorizations may fail or stop reporting.
To check whether SELinux is enabled, you can run:
getenforce.
-
If the command returns Enforcing, you must do this step.
-
If the command returns Permissive, you should do this step if you plan to switch to Enforcing (or want to prevent future enforcement issues).
-
If the command returns Disabled, you can skip to the next step.
If SELinux is enabled, it can block AuthZHelper from reading its configuration files, writing identity and cache files, and connecting to Trust Protection Foundation (TPF) over HTTPS.
Assign SELinux file context to AuthZHelper working files
Assign the correct SELinux file context to all AuthZHelper working files so AuthZHelper can read and write them.
TIP On RHEL 8/9, semanage is not always installed by default. The package is typically found at policycoreutils-python-utils.
Run the following commands as root:
semanage fcontext -a -t user_home_t /var/opt/cyberark/sshmanager/config.yml \
&& restorecon -vv /var/opt/cyberark/sshmanager/config.yml
semanage fcontext -a -t user_home_t /var/opt/cyberark/sshmanager/.authzid \
&& restorecon -vv /var/opt/cyberark/sshmanager/.authzid
semanage fcontext -a -t user_home_t /var/opt/cyberark/sshmanager/.authzhelper_secret \
&& restorecon -vv /var/opt/cyberark/sshmanager/.authzhelper_secret
semanage fcontext -a -t user_home_t '/var/opt/cyberark/sshmanager/.cache(/.*)?' \
&& restorecon -Rv /var/opt/cyberark/sshmanager/.cache
The user_home_t type allows AuthZHelper to read and write these files while SELinux enforcement remains enabled. These rules allow AuthZHelper to access its configuration, identity, secret, and cache files.
Allow outbound HTTPS from AuthZHelper (sshd_t domain)
SELinux blocks outbound HTTPS connections from the sshd_t domain by default. This prevents AuthZHelper from sending authorization data to Trust Protection Foundation (TPF).
You may see audit messages like this:
avc: denied { name_connect } for pid=208725 comm="authzhelper" dest=443 …
As a workaround, set the sshd_t domain to permissive so SELinux no longer blocks AuthzHelper actions (including outbound HTTPS). The permissive setting does not only allow outbound 443; it also disables SELinux enforcement for all actions performed in the sshd_t domain.
Run the following command as root:
# Allow sshd_t domain to operate in permissive mode for outbound HTTPS
semanage permissive -a sshd_t
Notes
-
This action does not disable SELinux globally.
-
Only the sshd_t domain is placed in permissive mode.
-
This is the simplest and most validated configuration for AuthZHelper.
-
An SELinux policy module can also be used, but permissive mode for sshd_t is the best approach.
Verify SELinux configuration
Confirm that the file contexts are applied correctly by running: semanage fcontext -l | grep sshmanager
Expected result
-
user_home_tis assigned to:-
config.yml -
.authzid -
.authzhelper_secret -
.cache/*
-
Check for symptoms of misconfigured SELinux
If SELinux is not configured correctly, you may see one or more of the following issues:
-
SSH authorization results appear on the first day, then stop appearing the next day
-
AuthZHelper logs show permission denied errors when reading files
-
Trust Protection Foundation stops receiving SSH authorization sessions
-
SELinux audit logs show sshd_t denial events
Review these files for errors:
-
/var/log/messages -
/var/log/audit/audit.log(look for AVC denials) /var/opt/cyberark/sshmanager/authzhelper.log
Step 8: Review the setup after installing AuthZHelper on Linux (any distribution)
After AuthZHelper files are installed and configured, you should review config.yaml for accuracy. The example below is meant as a reference and may not match your configuration.
#proxy-url: proxy.local
#proxy-ca-trust: /var/opt/cyberark/sshmanager/haproxy.pem
api-host: WIN-TPF.example.com
ca-trust: /var/opt/cyberark/sshmanager/api-cert.pem
AuthorizedKeysFile: .ssh/authorized_keys .ssh/authorized_keys2
#TrustedUserCAKeys: /etc/ssh/ca.pub
#AuthorizedPrincipalsFile: /etc/ssh/principals
log: /var/log/authzhelper/authzhelper.txt
failure_mode: fail_open #this is new to 26.1 - defaults to open
debug: false
Config definitions
-
proxy-url: The FQDN or IP of the proxy server that will be used to reach Trust Protection Foundation.
-
proxy-ca-trust: The trust bundle associated with the proxy connection / server.
-
api-host: The FQDN of the Trust Protection Foundation (TPF) server. This should match a SAN entry of the presented TLS certificate.
-
ca-trust: Trust bundle (root+ICA) for the TPF server.
-
AuthorizedKeysFile: Location of user public keys. Formatting should comply with the OpenSSH documentation.
-
TrustedUserCAKeys: Location of the TrustedUserCAKeys file. Formatting should match that of OpenSSH documentation.
-
AuthorizedPrincipalsFile: Location of the AuthorizedPrincipals files. Formatting should match that of OpenSSH documentation.
-
log: Location of the log file. By default, events and logs are sent to journalctl.
-
failure_mode: fail_open/fail_closed This relates to how AuthzHelper will act when a connection to TPF can not be established.
-
debug: Debug level for logging and auditing.
-
disableTlsRenegotiation: (Set to true) Required when explicit TLS 1.3 is enabled on the TPF server.
Step 9: Authenticate AuthZHelper
Before AuthZHelper can begin reporting SSH authorization events to the Trust Protection Foundation, it must first be authenticated using the credentials of the dedicated user you created in Trust Protection Foundation.
This section provides steps to authenticate AuthZHelper to Trust Protection Foundation.
-
From the location of the binary (/usr/bin/authzhelper), authenticate the AuthZHelper client to Trust Protection Foundation by running sudo authzhelper authenticate --debug and providing the username and password that was assigned when creating the user in Trust Protection Foundation.
-
Confirm that the authentication was successfully completed:

-
Verify that AuthZHelper has authenticated to Trust Protection Foundation and is capable of reporting SSH authorizations by performing the following:
-
Ensure the SSHD configuration is set up as shown under SSH Configuration.
-
Restart the SSH service or reboot the machine. For example
systemctl restart sshdorservice ssh restart(distribution dependent) -
Visit theAuthorization menu option in SSH Manager for Machines in TPF Admin Console to verify that the SSH Key Authorization Rules features are available.
-
What happens during authentication
When you run authzhelper authenticate, AuthZHelper obtains an OAuth token from Trust Protection Foundation and stores it locally. Starting in version 26.2, this token is encrypted at rest using AES-256-GCM and bound to the machine where authentication was performed.
This means:
-
The token file (
.authzhelper_secret) now contains encrypted content instead of readable JSON. This is expected behavior. -
A machine identity file (
.authzid) is created automatically if it does not already exist. This file ties the token to the specific host. -
Tokens cannot be copied from one machine to another. Each host must run
authzhelper authenticateindependently. -
There is no configuration option to disable encryption. It is always on.
-
All existing commands, workflows, and configuration files remain unchanged. There is no performance impact.
How to verify encryption is active
To confirm that the token is encrypted run:
cat /var/opt/cyberark/sshmanager/.authzhelper_secret
-
Encrypted (expected): The output is random-looking Base64 text.
-
Not encrypted (pre-26.2): The output is readable JSON containing an "access_token" field.
Upgrading from a version prior to 26.2
If you are upgrading from a version prior to 26.2, existing plaintext tokens are automatically migrated to encrypted format the first time authzhelper authorize runs after the upgrade. No manual action is required.
To confirm migration completed, run authzhelper authorize with debug logging enabled and look for the following message in the log output:
Successfully migrated token to encrypted format
With all steps completed, AuthZHelper is now fully integrated with Trust Protection Foundation. This setup enhances centralized SSH authorization, improves SSH audit ability, and reduces reliance on local key configurations. For next steps, see Managing and monitoring SSH Key Authorization Rules.
Step 10: Troubleshoot AuthZHelper setup
If you encounter problems setting up AuthZHelper, see this section.
Multi-host environments
Each machine that runs AuthZHelper must authenticate independently. Because credentials are encrypted and bound to the machine's Agent ID, you cannot share or copy credential files between hosts.
To deploy AuthZHelper across multiple machines:
-
Install AuthZHelper on each host.
-
Run
authzhelper authenticateon each host individually. -
Verify that each host has its own
.authzidand.authzhelper_secretfiles.
Do not copy .authzid or .authzhelper_secret from one host to another. Doing so will cause authentication failures.
Backup and restore guidelines
Not all AuthZHelper files are portable across machines. The following matrix shows which files can be backed up and restored to a different host.
| File | Path | Backup? | Restore to same host? | Restore to different host? | Notes |
|---|---|---|---|---|---|
| Config | /var/opt/cyberark/sshmanager/config.yml
|
Yes |
Yes | Yes | Configuration is portable across hosts. |
| TPF Trust Bundle | /var/opt/cyberark/sshmanager/ca-cert.pem
|
Yes |
Yes | Yes | Certificate bundle is portable across hosts. |
| Encrypted token | /var/opt/cyberark/sshmanager/.authzhelper_secret
|
Yes | Yes | No | Token is bound to the machine where it was created. Restoring to a different host will fail. Run authzhelper authenticate on the new host instead. |
| Machine identity |
/var/opt/cyberark/sshmanager/.authzid
|
Yes |
Yes | No | Contains a unique machine UUID. Do not copy between hosts. A new one is generated automatically during authentication. |
| System machine ID | /etc/machine-id
|
No |
N/A | N/A | Managed by the operating system. Do not back up or restore. |
Troubleshooting encrypted credentials
| Error message | Cause | Resolution |
|---|---|---|
decrypt failed or cipher: message authentication failed |
The .authzhelper_secret file was copied from another machine, or the .authzid file is missing or corrupted. |
Delete both
|
invalid agent ID
|
The .authzid file has been modified or contains an invalid UUID. |
Delete
|
| Token file contains unreadable content | Expected behavior in 26.2+. The token is now AES-256-GCM encrypted. | No action needed. AuthZHelper decrypts the token automatically at runtime. |
| Authentication works on one host but not another | Credential files were copied between hosts instead of authenticating each host independently. |
Run the following on the failing host to generate its own credentials.
|
token migration failed: <reason>
|
AuthZHelper attempted to migrate a pre-26.2 plaintext token to encrypted format but failed. |
Check file permissions on
|
.