Mapping to a self-service key
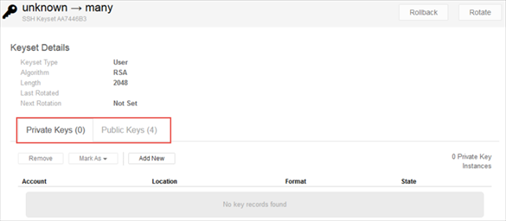
When you view the keyset details page for an orphaned keyset, you can see that it has no corresponding private key instance. For example:
When you create a mapping to an self-service key using Add New, Trust Protection Platform creates a proxy of the private key. Therefore, the public key is no longer an orphan and is removed from the list of orphaned keys.
TIP Add, Remove, and Edit are enabled on devices that are in a Policy with security level Remediate. Rotation is enabled only if all devices are in a Policy with security level Remediate.
To resolve orphaned keys through Self-service key mappings
-
From the Key Totals widget in the
-
In the SSH Keys list view, click an orphaned keyset in the Access column.
-
On the Private Keys tab, click Add New; OR, if there is a warning banner across the top of the screen, you can click Add Private Key.
-
In the Add Private Key window, enter the following information:
 Field Descriptions
Field Name Description Location Enter the computer, hostname, or other identifying location. Owner Select the identity of the keyset owner. This may be an individual or a group. In addition[...] Enter an e-mail address to use as a secondary identity for sending status updates. Folder Select the folder in Trust Protection Platform to store the keyset. Notes Enter any additional notes you want to make about this keyset. - Verify your settings, and then click Add Private Key.
Once an self-service key has been set and saved, the keyset details shows a the self-service key.
Before you can download the self-service key, you need to Rotate the keyset. For more information, see Rotating SSH keys.