Creating custom fields
Code Sign Manager - Self-Hosted allows you to create custom fields to capture additional metadata for certificates, code signing projects, and code signing environments. Custom fields enable you to track organization-specific information that is not part of the standard Code Sign Manager - Self-Hosted data model.
To create a custom field
-
From the Code Sign Manager - Self-Hosted menu bar, click Configuration > Custom Fields.
-
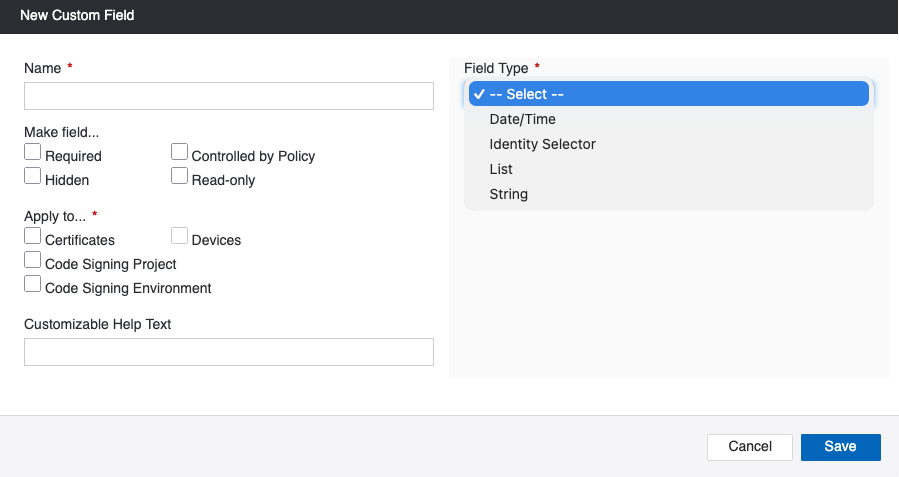
Click Add New Custom Field. The New Custom Field modal opens.
-
In the New Custom Field dialog, configure the following:
-
Name: Enter a unique name for the custom field.
-
Make field: Select one or more options to control field behavior:
-
Required: Make the custom field required.
-
Hidden: Prevents the custom field from appearing in the user interface.
-
Read-Only: Users can view the field value but cannot edit it.
-
Controlled by Policy: Not applicable in the code signing context.
NOTE The Required, Hidden, and Read-Only options are mutually exclusive. Controlled by Policy can be selected independently or in combination with the other options.
-
-
Apply to: Select one or more object types where this custom field should appear:
-
Certificates
-
Code Signing Project
-
Code Signing Environment
NOTE Devices is not applicable in the code signing context.
-
-
Customizable help text: Optionally enter help text that will be displayed to users when they interact with this field.
-
Field Type: Select the type of data this field will store:
-
Date/Time: A date and time value.
-
Identity Selector: Allows users to select a specific user or group.
-
List: A predefined list of values. When you select this option, you can configure:
-
Single Select: Users can select only one item from the list.
-
Multi Select: Users can select multiple items from the list.
-
Store the Display Name: When selected, the value shown in the Stored Value fields is also stored in the database. Unchecking in disables the Stored Value field for all list items.
-
Display Name: The text shown to users when selecting from the list.
-
Stored Value: The value stored in the database when this item is selected. This field is disabled if Store the Display Name is not selected.
-
Click Click to add new list item to add items to the list.
-
-
String: A text value. When you select this option, you can configure:
-
Validation Template: Select a predefined validation pattern, or choose Custom to define your own. When you select a predefined template, the Validation Regular Expression field is automatically populated with the corresponding regular expression.
-
Validation Regular Expression: Displays the regular expression for the selected template. If you selected Custom as the validation template, enter your own regular expression to validate user input.
-
Validate Sample Entry: Enter a sample value to test whether it matches the regular expression.
-
Customizable Error Message: Enter the error message to display when validation fails.
-
-
-
-
Click Save.
The custom field will appear on the pages for the object types you selected in the Apply to... setting.