Answer File wizard
An answer file is an XML-based file that contains configuration information for your installation of CyberArk Trust Protection Foundation - Self-Hosted. It includes the enabled modules, database connection information, and security keys used for the configuration. Using an answer file during installation makes it easy to use the same installation settings across multiple servers in your CyberArk Trust Protection Foundation - Self-Hosted cluster. An answer file is also helpful for upgrading your system, if you use a non-traditional upgrade method.
The answer file can be generated in two different ways. If you have installed CyberArk Trust Protection Foundation - Self-Hosted, you're probably aware of the ability to create an answer file when you install Trust Protection Foundation using the GUI.
You can also generate an answer file from the CyberArk Configuration Console once you have installed CyberArk Trust Protection Foundation - Self-Hosted on a server. This topic discusses how to create an answer file using the Answer File Wizard in the configuration console.
To generate an answer file using CyberArk Configuration Console
- Log in to the CyberArk Trust Protection Foundation - Self-Hosted Windows server and launch CyberArk Configuration Console.
-
[Optional] If you want to Disable validation of the provided values, check the box.
Generally, you will want to validate the values as you enter them into the answer file wizard. However, if you are configuring for a server in a different zone (say a production server that you can't access due to the network configuration), you will want to disable validation so the system doesn't provide an error when you enter connection information that can't be verified.
-
From the root CyberArk Configuration node in CyberArk Configuration Console, click Run Answer File Wizard in the Actions panel on the right.
-
Click Next.
-
[Optional]
-
On the Component Selection tab, use the tree to select which components and features you want to enable for the installation.
IMPORTANT The installation will not work properly unless you select at least one product (Certificate Manager - Self-Hosted, Code Sign Manager - Self-Hosted, or SSH Manager for Machines). If you are trying to install a UI-only server (WebConsole) you need to select one top-level product, in addition to the UI components in the Common Components list. However, in that case, you can deselect the child components of the top-level product. For example, this is a valid configuration:
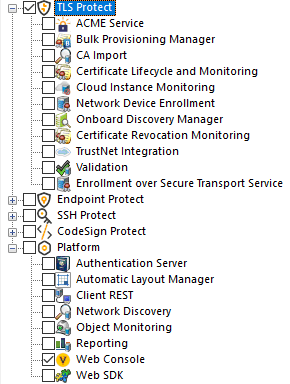
Select the components you want to install, then click Next.
-
On the Hardware Encryption tab, determine if you want to use hardware encryption.
CyberArk Trust Protection Foundation can encrypt data using one or more keys stored in an HSM. For code signing, CyberArk Trust Protection Foundation can use private keys stored on an HSM to sign code. To enable hardware encryption, check the box, and fill out the requested information.
 Hardware encryption field descriptions
Field
Description
Name
Name of the HSM connector. This name will be how Master Admins identify this HSM connector when they are creating environment templates. In this example, we'll name it Default HSM.
Cryptoki DLL Path
Trust Protection Foundation requires access to the 64-bit version of Cryptoki DLL.
For SafeNet Luna SA devices, this is the path to the
cryptoki.dllfile.For Entrust nShield Connect HSM devices, this is the path to the
cknfast.dllfile.After selecting the DLL, click Load Slots. Trust Protection Foundation will query the HSM and return the available slots.
IMPORTANT Trust Protection Foundation requires the path to the DLL file to initialize the connection to the HSM device. This path will be used for all Trust Protection Foundation servers in the cluster (connected to the same database). All servers in the cluster must have their DLL file in the same location.
Slot
Slot ID for the HSM partition where you want Trust Protection Foundation to access the encryption keys.
NOTE While slot numbers are listed in the drop-down list, Trust Protection Foundation does not depend on slot numbers. Trust Protection Foundation identifies HSM partitions by label first, and in the case that there are duplicate labels, it falls back to the serial number.
User Type
User type required to access the HSM keys on the designated partition (Slot ID).
The designated User Type must have sufficient permissions to use the keys in the Encryption Driver’s Permitted Keys list.
Pin
Pin, if one is required to access the HSM.
If you use Entrust nShield token protection, leave the field empty.
If you are setting up AWS CloudHSM, the pin must be in the following format:
<CU_user_name>:<password>.Default key
The default encryption key used by the system. If you are adding a server to an existing database, you cannot change this selection. This is also the key used to protect the database connection string stored in the registry.
If you want to generate a new AES 256-bit symmetric key on the HSM, click this button. A new key will be generated.
NOTE In the table above, if you chose to disable validation, the Default Key field is a text field, and there is no Create button.
TIP If you are installing to an existing database, if hardware encryption is enabled, you will need to enter the PIN to continue, even though no other information appears on the screen.
NOTE You must select either one or both encryption types (hardware and/or software encryption).
IMPORTANT The keys used to encrypt Trust Protection Foundation are critical to the system's functionality. Without the encryption keys, you cannot access the database or stored secrets.
-
On the Software Encryption tab, determine if you want to use software encryption.
CyberArk Trust Protection Foundation - Self-Hosted can encrypt data using a software encryption key.
If you are connecting to a new database, you can either provide a key, or have one generated for you.
If you are connecting to an existing database, you must use the software key used to encrypt that database.
Software encryption field descriptions
Field
Description
Generate a New Key Choose this option if this is a new installation and you want the system to generate a new, unique key for this database.
Use Local System Key
Chose this option if you want to use the key from the currently-running server. This saves you the effort of locating, extracting, and reusing the existing key.
Use Shared Key Choose this option if you are connecting to an existing database secured by a software encryption key, or if you have an existing key you want to use.
Key Password (Only if using Shared Key option) If the key is encrypted with a password, enter the key's password.
Encoded Key (Only if using Shared Key option) Enter or paste the entire encryption key (including the --- Begin --- and ---End--- lines).
If you are connecting to an existing database
TIP If you are installing with an existing database, if software encryption has not been configured for that database, the options on this screen will be disabled.
NOTE You must select either one or both encryption types (hardware and/or software encryption).
IMPORTANT The keys used to encrypt Trust Protection Foundation are critical to the system's functionality. Without the encryption keys you cannot access the database or stored secrets. Consequently, if you use a software encryption key, it is highly recommended that you back up the key to a secure location. In the event of a system failure, you can restore the key so Trust Protection Foundation can access your system data.
-
On the Database Settings tab, choose either the Settings tab or the Expert tab, and fill out the connection information for your database. If you enter different data into both tabs, the tab you are on when you click Next will determine which settings are applied.
Before you configure a new database connection, you must have previously created the Trust Protection Foundation database and configured both database service accounts.
For information about the types of database service accounts and permissions they need, see Setting up your Microsoft SQL database server.
Field descriptions - Settings tab
Field
Description
Hostname
Enter the hostname, FQDN, or IP address for the database connection.
NOTE If you enable the TLS encrypted connection, you will need to enter the FQDN that matches the certificate presented by the MSSQL server.
Port
Enter the database port number. The default port is 1433.
Database
Enter the name for the CyberArkTrust Protection Foundation database.
Server supports TLS encrypted connections
Enabling this option encrypts all communications between the CyberArk Trust Protection Foundation - Self-Hosted server and the back end database. If this option is not selected, the credentials are still protected but all other communications between the server and the database might not be protected.
Recommendation: Enable
Enable AlwaysOn Availability Groups
The Always On Availability Groups feature is a high-availability and disaster-recovery solution that provides an enterprise-level alternative to database mirroring.
When using this setting, use the virtual server name of the availability group listener in the hostname field.
CAUTION Using AWS Multi-AZ (Availability Zone) requires special configuration including creating a virtual private cloud (VPC) with both private and public subnets. It also requires that Multi-AZ be turned off during installation, and turned back on after installation is complete. Please contact CyberArk Customer Support for additional configuration instructions.
Field Description Type Trust Protection Foundation allows you to use either Windows integrated authentication or Microsoft SQL native authentication to authenticate to the database. Select your connection option from the list. Windows integrated authentication is the preferred method for security purposes as it allows for central management of accounts and passwords in Active Directory. If you use gMSAs, you don't even need to worry about passwords and rotation of passwords.
Login Enter the account name that has the required permissions.
If using Windows Authentication, enter the user name, in UPN format, of the service account user that will access the database, so that services and web applications can be configured to run under the selected account.
If using a gMSA, use the format
<DOMAIN>\<ACCOUNT>$. For example, if your domain isjupiterand your gMSA name isganymede, you would usejupiter\ganymede$. Don't forget the trailing$.Password
Enter the password for the user account connecting to the database. If you are using a gMSA, this field will be disabled.
NOTE The lowest level of database grants that the operational account requires is automatically provided by Trust Protection Foundation through the database owner account.
Field descriptions - Expert tab
Field
Description
Field Description Connection String The connection string is a combination of the database settings selected above.
This option is most commonly used if your database administrator instructs you to use a connection string with additional parameters that aren't available in the CyberArk Configuration Console user interface.
Password The password to connect to the database.
If there is a password provided in the connection string, that password will be used for the connection, regardless of what is set in the Password field.
If you are connecting to an existing database
-
On the Administrative Account tab, enter information for the local master admin account for CyberArk Trust Protection Foundation.
You need to create a local master admin account for Trust Protection Foundation. You will use this account to log in to Trust Protection Foundation and to perform maintenance and upgrade tasks in the system. The local master admin account has all permissions to every object in Trust Protection Foundation.
Enter the user name and password. Password requirements are show on the screen. The password will be validated locally to verify it meets complexity requirements.
Verify the password, then click Next.
-
On the Message Bus tab, select whether or not you want to use a TLS-encrypted connection for the Message Bus (the MQTT broker used to communicate between servers in the cluster). The default is to use TLS.
We recommend using the IANA registered ports for MQTT: port 8883 for TLS, or port 1883 for unencrypted.
If you plan to use an external MQTT broker, click Central MQTT broker, then provide the URL to the service, and authentication information.
For more details on Message Bus and its configuration, see Working with Message Bus.
If you don't know what to enter here, you can likely accept the default values.
Continue to the next tab by clicking Next.
-
On the Algorithms tab, you see the default algorithms available for global use with CyberArk Trust Protection Foundation - Self-Hosted. Click Modify... to edit the list. The table on the left is the list of algorithms supported by CyberArk Trust Protection Foundation - Self-Hosted that haven't been added to the approved list. The table on the right is a list of algorithms you want to be available globally for your organization. (You can further restrict algorithm use by policy, if you want settings to not apply globally.) To enable an algorithm, move it from the left table to the right table using the arrows.
For details on configuring the default algorithms, see About default algorithm configuration. For a comprehensive list of supported algorithms, see Algorithm types supported by CyberArk Trust Protection Foundation - Self-Hosted.
NOTE If you are using an answer file that already includes supported algorithms, this tab won't let you adjust what is listed in the answer file. You can modify the supported algorithms after you finish the upgrade by going to CyberArk Configuration Console, and clicking Configure Allowed Algorithms. For detailed steps, see Configuring allowed algorithms.
-
On the Event Logging tab, determine if you want this server to process log events.
At least two Trust Protection Foundation servers needs to have event logging enabled. If event logging is configured on two different servers, you can leave this check box cleared.
CyberArk recommends you define a retention period to control growth of the database. Trust Protection Foundation will periodically automatically delete logs older than the specified number of days.
Click Next.
-
On the Environment tab enter the required information.
Enter your organization name, and select the deployment type for
Your organization name and deployment type are used in Trust Protection Foundation reports, and may be used in the future in other ways to enhance your product experience.
-
On the Customer Experience tab, review the information on how data is collected.
NOTE Participation in the Customer Experience Improvement Project is required for all customers, enabling CyberArk to gather license utilization and product usage telemetry. This does not include any personally-identifiable data. Read more about our data collection policy in the CyberArk Data Privacy Policy for Trust Protection Foundation.
-
On the
- Determine the location where the configuration progress and errors will be logged. If there is a problem with the configuration of the
- Specify whether CyberArk Trust Protection Foundation - Self-Hosted services should be started immediately upon completion of configuration.
-
We recommend you save your configuration as an answer file
- If you create an answer file, it is recommended that you encrypt your answer file with a password. An unencrypted answer file is a plain text XML file that contains information like your master admin user name and password, your database connection credentials, your software encryption key, and all other configuration settings.
- If you are just completing the wizard to create an answer file, select the appropriate option. The wizard will save the answer file and will close when you click the Finish button.
- Determine the location where the configuration progress and errors will be logged. If there is a problem with the configuration of the
-
Click Finish.
CyberArk Trust Protection Foundation - Self-Hosted will save the new configuration as an answer file in the specified location. When the answer file has been saved, click Close.