![]()
Trailhead: Provisioning certificates to a Google Cloud Load Balancer using Trust Protection Foundation and Google Cloud CA Service
You can simplify your enterprise PKI strategy using Google Cloud CA Service with CyberArk Trust Protection Foundation. No need to deploy additional servers; once configuration is complete, simply request a new certificate. As a PKI administrator, you'll have a much simpler method for revoking certificates since extracting from certificate authorities (CAs) in your network can be cumbersome. And of course, to keep things secure, you can keep your root certificates in a local CA.
Because of the relative simplicity of a cloud service solution, you can more easily prevent system outages because renewing certificates before they expire is pretty darn easy.
If you're already a pro at Google Cloud CA Service, this should be a snap. If you're new to Google products, you'll need to know how to create certificate authorities, grant permissions, and create roles. For the CyberArk side of the equation, we've got you covered!
IMPORTANT PKI setup is not only critical but highly unique within each organization. This Trailhead is not intended to prescribe a PKI method. We simply don't know your environment and unique needs and circumstances. But we are showing you how you could use Google Cloud CA with CyberArk to better secure and protect Cloud-native applications, such as load balancers.
Integrating Google Cloud CA Service with Trust Protection Foundation
Welcome to the Google Cloud CA Service integration Trailhead. We'll step you through the process from start to finish so that you'll be provisioning certificates from your Google Cloud CA Service to Google Cloud Load Balancer via Trust Protection Foundation in a jiffy. Well, maybe slightly more than a jiffy, especially if you're not familiar with Google or Trust Protection Foundation.
Time Estimate
 About 35 mins
Video Demo: Provisioning certificates to a Google Cloud Load Balancer using Google Cloud CA with Trust Protection Foundation
Here's a quick demo showing you the process from start (Google stuff) to finish (Trust Protection Foundation stuff). This video specifically shows configuring integration for certificate management on a Google Cloud Load Balancer. A few minutes with our demo video can save you time by helping you connect the dots before you start configuring stuff.
Trust us, the next few minutes will be worth your time.
Time: 3m:43s
Ready to go?
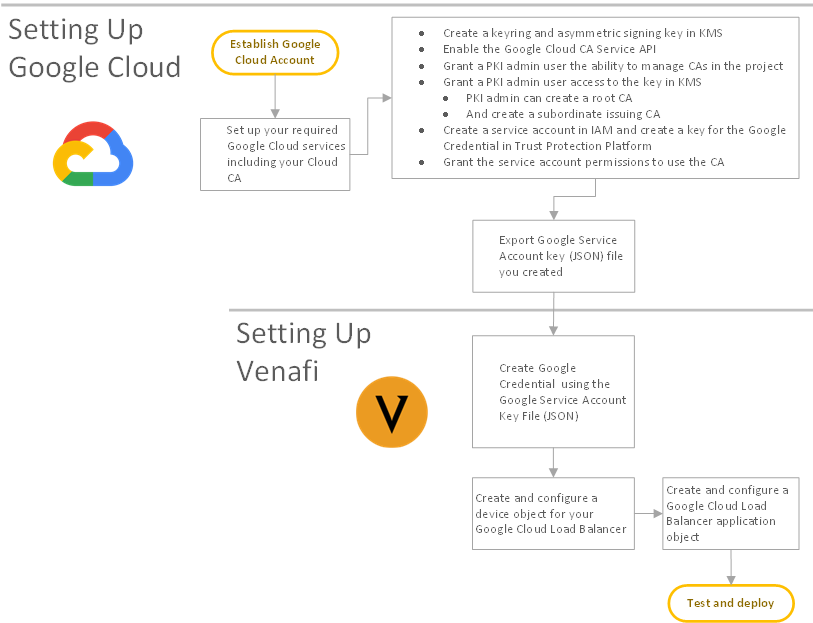
From a high level, here's what we're going to do. Think of these as the waypoints we'll pass on our way to the final the final destination: Google Cloud CA certificate provisioning to via Trust Protection Foundation to your cloud-native application.
- Set up the Google side with the correct account, services, roles and permissions.
- Set up the Trust Protection Foundation side to connect securely to the Google Cloud CA for requesting and provisioning certificates.
- Finally, perform a test tun to make sure it all works and that nothing goes Clank.
So, like this:
NOTE We suggest you follow all Google documentation to establish your Google Cloud account, if you haven't already.
Doing the Google thing
Google knows their stuff best, so we won't presume to give you all the details when using Google products. We always recommend that you carefully review and follow their documentation. But this is what we did and it worked quite well.
Time Estimate
About 15 mins
First things first
Before you jump in head first, take care of prerequisites right now (if you haven't already, you genius!); you'll be glad you did.
Prereq1
Prereq2
Prereq3
Configuring Google Cloud Platform
Using the "gcloud" CLI, configure your Cloud account to prepare what's required to integrate with the CyberArk Trust Protection Foundation - Self-Hosted. Here's what worked for us:
-
Create a keyring and asymmetric signing key in KMS:
gcloud kms keyrings create my-sample-keyring --location us-west1
gcloud kms keys create my-sample-key --location us-west1 \--keyring my-sample-keyring \
--purpose asymmetric-signing \
--default-algorithm rsa-sign-pkcs1-4096-sha256 \
--protection-level software
-
Enable the Google Cloud CA Service API:
gcloud service enable privateca.googleapis.com
-
Grant a PKI admin user the ability to manage CAs in the project:
gcloud projects add-iam-policy-binding my-project \
--member=user:pki-admin@my-company.com \
--role=roles/privateca.caManager
-
Grant a PKI admin user access to the key in KMS:
gcloud kms keys add-iam-policy-binding my-sample-key \
--keyring my-sample-keyring --location us-west1 \
--member=user:pki-admin@my-company.com \
--role=roles/cloudkms.admin
-
Now the PKI admin can create a root CA:
gcloud alpha privateca roots create my-sample-root-ca \
--kms-key-version "projects/my-project/locations/us-west1/keyRings/my-sample-keyring/cryptoKeys/my-sample-key/cryptoKeyVersions/1" \
--subject "CN=My Sample Root CA, O=My Company" \--max-chain-length 2
-
And a subordinate issuing CA:
gcloud alpha privateca subordinates create my-sample-issuing-ca \
--issuer my-sample-root-ca --location us-west1 \
--kms-key-version "projects/my-project/locations/us-west1/keyRings/my-sample-keyring/cryptoKeys/my-sample-key/cryptoKeyVersions/1" \
--subject "CN=My Sample Issuing CA, O=My Company" \
--reusable-config "subordinate-server-tls-pathlen-0"
-
Create a service account in IAM and create a key for the Google Credential in Trust Protection Foundation:
gcloud iam service-accounts create svc-acct-venafi \
--display-name "CyberArk Trust Protection Foundation"
gcloud iam service-accounts keys create \
--iam-account svc-acct-venafi@my-company.com venafi-tpp-key.json
-
Grant the service account permissions to use the CA:
gcloud iam roles create venafiGoogleCloudCADriver --project=my-project \
--title="CyberArk Google Cloud CA Driver" \
--description="Google CA least privilege for CyberArk Trust Protection Foundation" \ --permissions=privateca.certificateAuthorities.list,privateca.certificateAuthorities.get,privateca.certificates.get,privateca.certificates.create,privateca.certificates.update \
--stage=ALPHA
gcloud projects add-iam-policy-binding my-project \
--member=serviceAccount:svc-acct-venafi@my-company.com \
--role=roles/venafiGoogleCloudCADriver
Configuring Trust Protection Foundation
We know CyberArk products and machine identity. So just relax while we walk you through this.
Time Estimate
About 20 mins
First things first
Let's take care of a couple of prerequisites first.
- Make sure you have the right permissions to the Policy folder in WebAdmin where you'll be doing some configuration stuff. Specifically, you'll need
- View/Read/Write permissions for uploading your Google Service Account Key File
- Make sure you have your Google Service Account Key File ready for uploading to Trust Protection Foundation. You'll need it!
TIP Not sure how to set permissions on Policy folder? Look here, and then come back when you're ready.
Creating a Google Credential
A Google credential object is used by CyberArk Trust Protection Foundation to store your Google Cloud Service Account Key file. Your Google Service Account is used by CyberArk Trust Protection Foundation to access your Google Cloud CA and Google Cloud Load Balancer.
TIP If you're a developer, you might be interested in knowing that the Google credential is defined in the Trust Protection Foundation schema using the Google Credential class and implemented in Venafi.Drivers.GoogleCredential: CredentialObject.
To create a new Google Credential
-
From the Certificate Manager - Self-Hosted menu bar, click Policy Tree.
- From the Policy tree, select the folder where you want to create the Google Credential, and then click Add > Credential > Google Credential.
- In Credential Name, type a name for the new credential.
- Click Upload Google Service Account Key File (button near the top of the page), locate the JSON file, and then click Upload.
- Click Save.
Create and configure a Google Cloud CA object
To enable Trust Protection Foundation to manage certificates installed on Cloud-native applications such as Google Cloud Load Balancer, you must configure a Google Cloud CA application object. This object provides the information Trust Protection Foundation needs to monitor, enroll, or provision certificates on its associated Google devices.
BEST PRACTICE Consider managing CA object settings using a policy. For more information, see Managing CA templates using policies.
To create and configure a new Google Cloud CA object
-
From the Certificate Manager - Self-Hosted menu bar, click Policy Tree.
- From the Policy tree, select the folder where you want to create the Google Cloud CA template, click Add > CA Template > Google Cloud CA.
- In the CA Name field, type a name for the new template.
- (Optional) If you find it helpful, type a description for the new template. This might not help you, but it might help other users who might need to use or edit your template later.
- (Optional) Click
 and select other users who should receive email notifications related to your Google Cloud CA.
 - Under Connection, click and select the Google credential you created previously, and then click Validate.
- Under Options, do the following:
(Optional) Select Subject Alt Name Enabled if you want this CA object to support CSRs with DNS-based subject alt name (SAN) values.
DID YOU KNOW? Today, you can specify SANs on your CSR, but only if the CSR has no embedded SANs. Not all CAs support adding additional SANs (additive SANs); so to allow maximum compatibility across many CAs, Trust Protection Foundation prevents the use of additive SANs.
(Optional) Select Allow Users to Specify End Date if you want this CA object to allow users to specify expiration (end) dates for certificates requested from the CA so that they do not expire during your known freeze periods.
- In Validity Period, type the number of days until certificates should expire.
- When you're finished, click Save.