Server Agent registration and installation overview
To get the Server Agent running, you need to perform tasks on both the Trust Protection Foundation server, and on client-side systems where you want to manage trust assets.
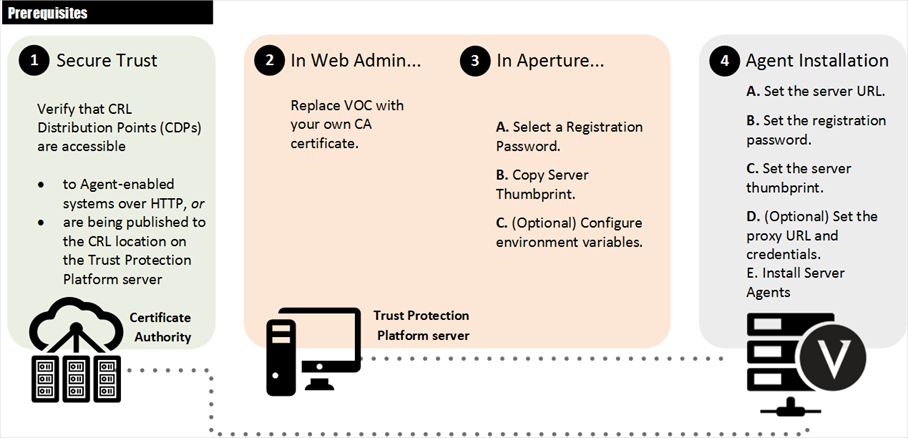
The following diagram provides a high-level view of how to configure Trust Protection Foundation and install the Server Agent on systems where you want to discover trust assets.
4 steps to getting the Server Agent up and running
-
(Prerequisites) Secure the Trust Protection Foundation server.
Make sure that CRL Distribution Points (CDPs) are accessible by your agent-enabled systems; or if they are not, make sure that they are getting published to the CRL location on the Trust Protection Foundation server.
For more information about CRL verification, see Guidelines for agent CRL Checking and Enabling CRL Verification.
-
(Recommended) Using Policy Tree, do the following:
Replace the self-signed Venafi Operational Certificate (VOC) with your own trusted certificate. You should replace the self-signed certificate created during install of the Trust Protection Foundation with your own certificate issued by a certificate authority (CA).
See Replacing the Venafi Operational Certificate with your own CA-signed certificate.
-
In Certificate Manager - Self-Hosted, do the following:
- See Selecting (or creating) Registration Passwords for Agent Registration Settings.
- Select (or create) a registration password credential. On the Clients > Agent Registration Settings page in Certificate Manager - Self-Hosted, select an existing password credential, or create a new one.
-
Copy the Trust Protection Foundation server thumbprints for use in registering agents.
See About the Trust Protection Foundation server certificate thumbprint.
-
(Optional) Configure environment variables. Environment variables help you to key off of specific information you have set on servers for grouping agents and their associated systems.
-
Regardless of the platform on which you install the Server Agent, you must set the following parameters, and then install the Server Agent on target systems:
- Set the Trust Protection Foundation server URL. During install, you must specify the server URL (server_url=ServerURL) where serverURL is the URL of the Trust Protection Foundation server and must use the secure HTTPS protocol.
For example: server_url=https://myserver/vedclient - Set the registration password. Specify the registration password (registration_password=RegistrationPassword that you selected above.
- Set the server thumbprints. Paste the server thumbprints (server_thumbprint=ServerThumbprints that you copied from the Aperture Agent Registration Settings page in a previous step.
- (Optional) Set the proxy URL and credentials. If you are using a proxy server, specify its URL and credentials (proxy_url=ProxyURL proxy_username=ProxyUsername proxy_password=ProxyPassword) .
-
Install the Server Agent on target systems. After you have successfully set the parameters, you can install the Server Agent on systems where you want to secure and protect encryption assets.
For details, see Installing the Server Agent.
- Set the Trust Protection Foundation server URL. During install, you must specify the server URL (server_url=ServerURL) where serverURL is the URL of the Trust Protection Foundation server and must use the secure HTTPS protocol.
What's Next?
After the Server Agent is installed and registered with the Trust Protection Foundation server, you can then define Client Group Settings and assign work to the installed agents.
For more information about Client Group Settings, see Working with Client Group Settings.