Setting up Code Sign Manager - Self-Hosted to use HSM keys
Because of the sensitive nature of code signing keys, most organizations store them on Hardware Security Modules (HSM). HSMs are specifically designed to generate and protect sensitive cryptographic keys.
Using an HSM with CyberArk Code Sign Manager - Self-Hosted allows you to take advantage of the security offered by the HSM, coupled with the usability, key use restrictions, and auditing provided by Code Sign Manager - Self-Hosted. This strikes the optimal balance between security, usability, and visibility.
This article walks you through all of the steps to configure Code Sign Manager - Self-Hosted to use keys on an HSM, whether those key already exist on the HSM or whether you'll use Code Sign Manager - Self-Hosted to generate new ones.
Before you start
Before getting started, you'll need to have a few things in place:
- At least one Trust Protection Foundation server installed
- CyberArk Code Sign Manager - Self-Hosted and Advanced Key Protect licensed and enabled
-
An HSM that has a PKCS#11 library. See our supported HSM list for recommendations.
 See supported HSM list
IMPORTANT CyberArk recommends you consult the partner documentation for minimum supported versions.
TIP The following tables show vendor support for generating private keys. In all cases, this refers to Hardware Central Key Generation. Learn more about Supported methods of key generation.
Supported HSM
Docs Encrypt Secrets
HCKG for private keys1
Code Signing Certificate Private Key Storage2
Entrust nShield Connect HSM
Partner PDF 
Thales SafeNet Luna SA (including Azure Dedicated HSM)
Partner Docs
Vendor Self-Certified HSMs
NOTE The HSM Partners on the list below have gone through the process of self-certification. This process involves testing the specific PKCS#11 mechanisms that Trust Protection Foundation uses when an HSM is used to protect things like private keys and credential objects, and when Advanced Key Protect is enabled.
Self- certification means that the partner has done the testing and proven successful results and integration with CyberArk. Successful self-certification results indicate that the integration will work as expected. The HSM vendor may need to be engaged if something is working unexpectedly. Consult the partner's documentation to know what firmware version requirement is.
HSM Vendor
HSM Product
Docs Encrypt Secrets
HCKG for private keys3
Code Signing Certificate Private Key Storage4
Atos
Trustway Proteccio
PDF (no public link; contact vendor)
AWS CloudHSM CyberArk Docs
Crypto4A
QxEDGE
Entrust
Entrust nShield as a Service
Partner Docs
Fortanix
Fortanix DSM
Partner Docs
FutureX
Vectra Plus
Partner Docs
Gradiant
KeyConnect
Securosys
Primus HSM and Cloud HSM Service
Partner Docs (Login required)
Thales TCT
T-Series Luna
Partner Docs
Thales
Data Protection on Demand
Partner Docs
Utimaco
CryptoServer
Partner Docs (Login required)
Ready to go?
The following table and flowchart summarize the steps you'll take as you work through this article. There are several systems and roles involved, so this article is written with multiple interim completion points. These tasks must be completed in order since the output from one task becomes the input to the next task.
Click here to open a larger version of this flowchart in a new tab.
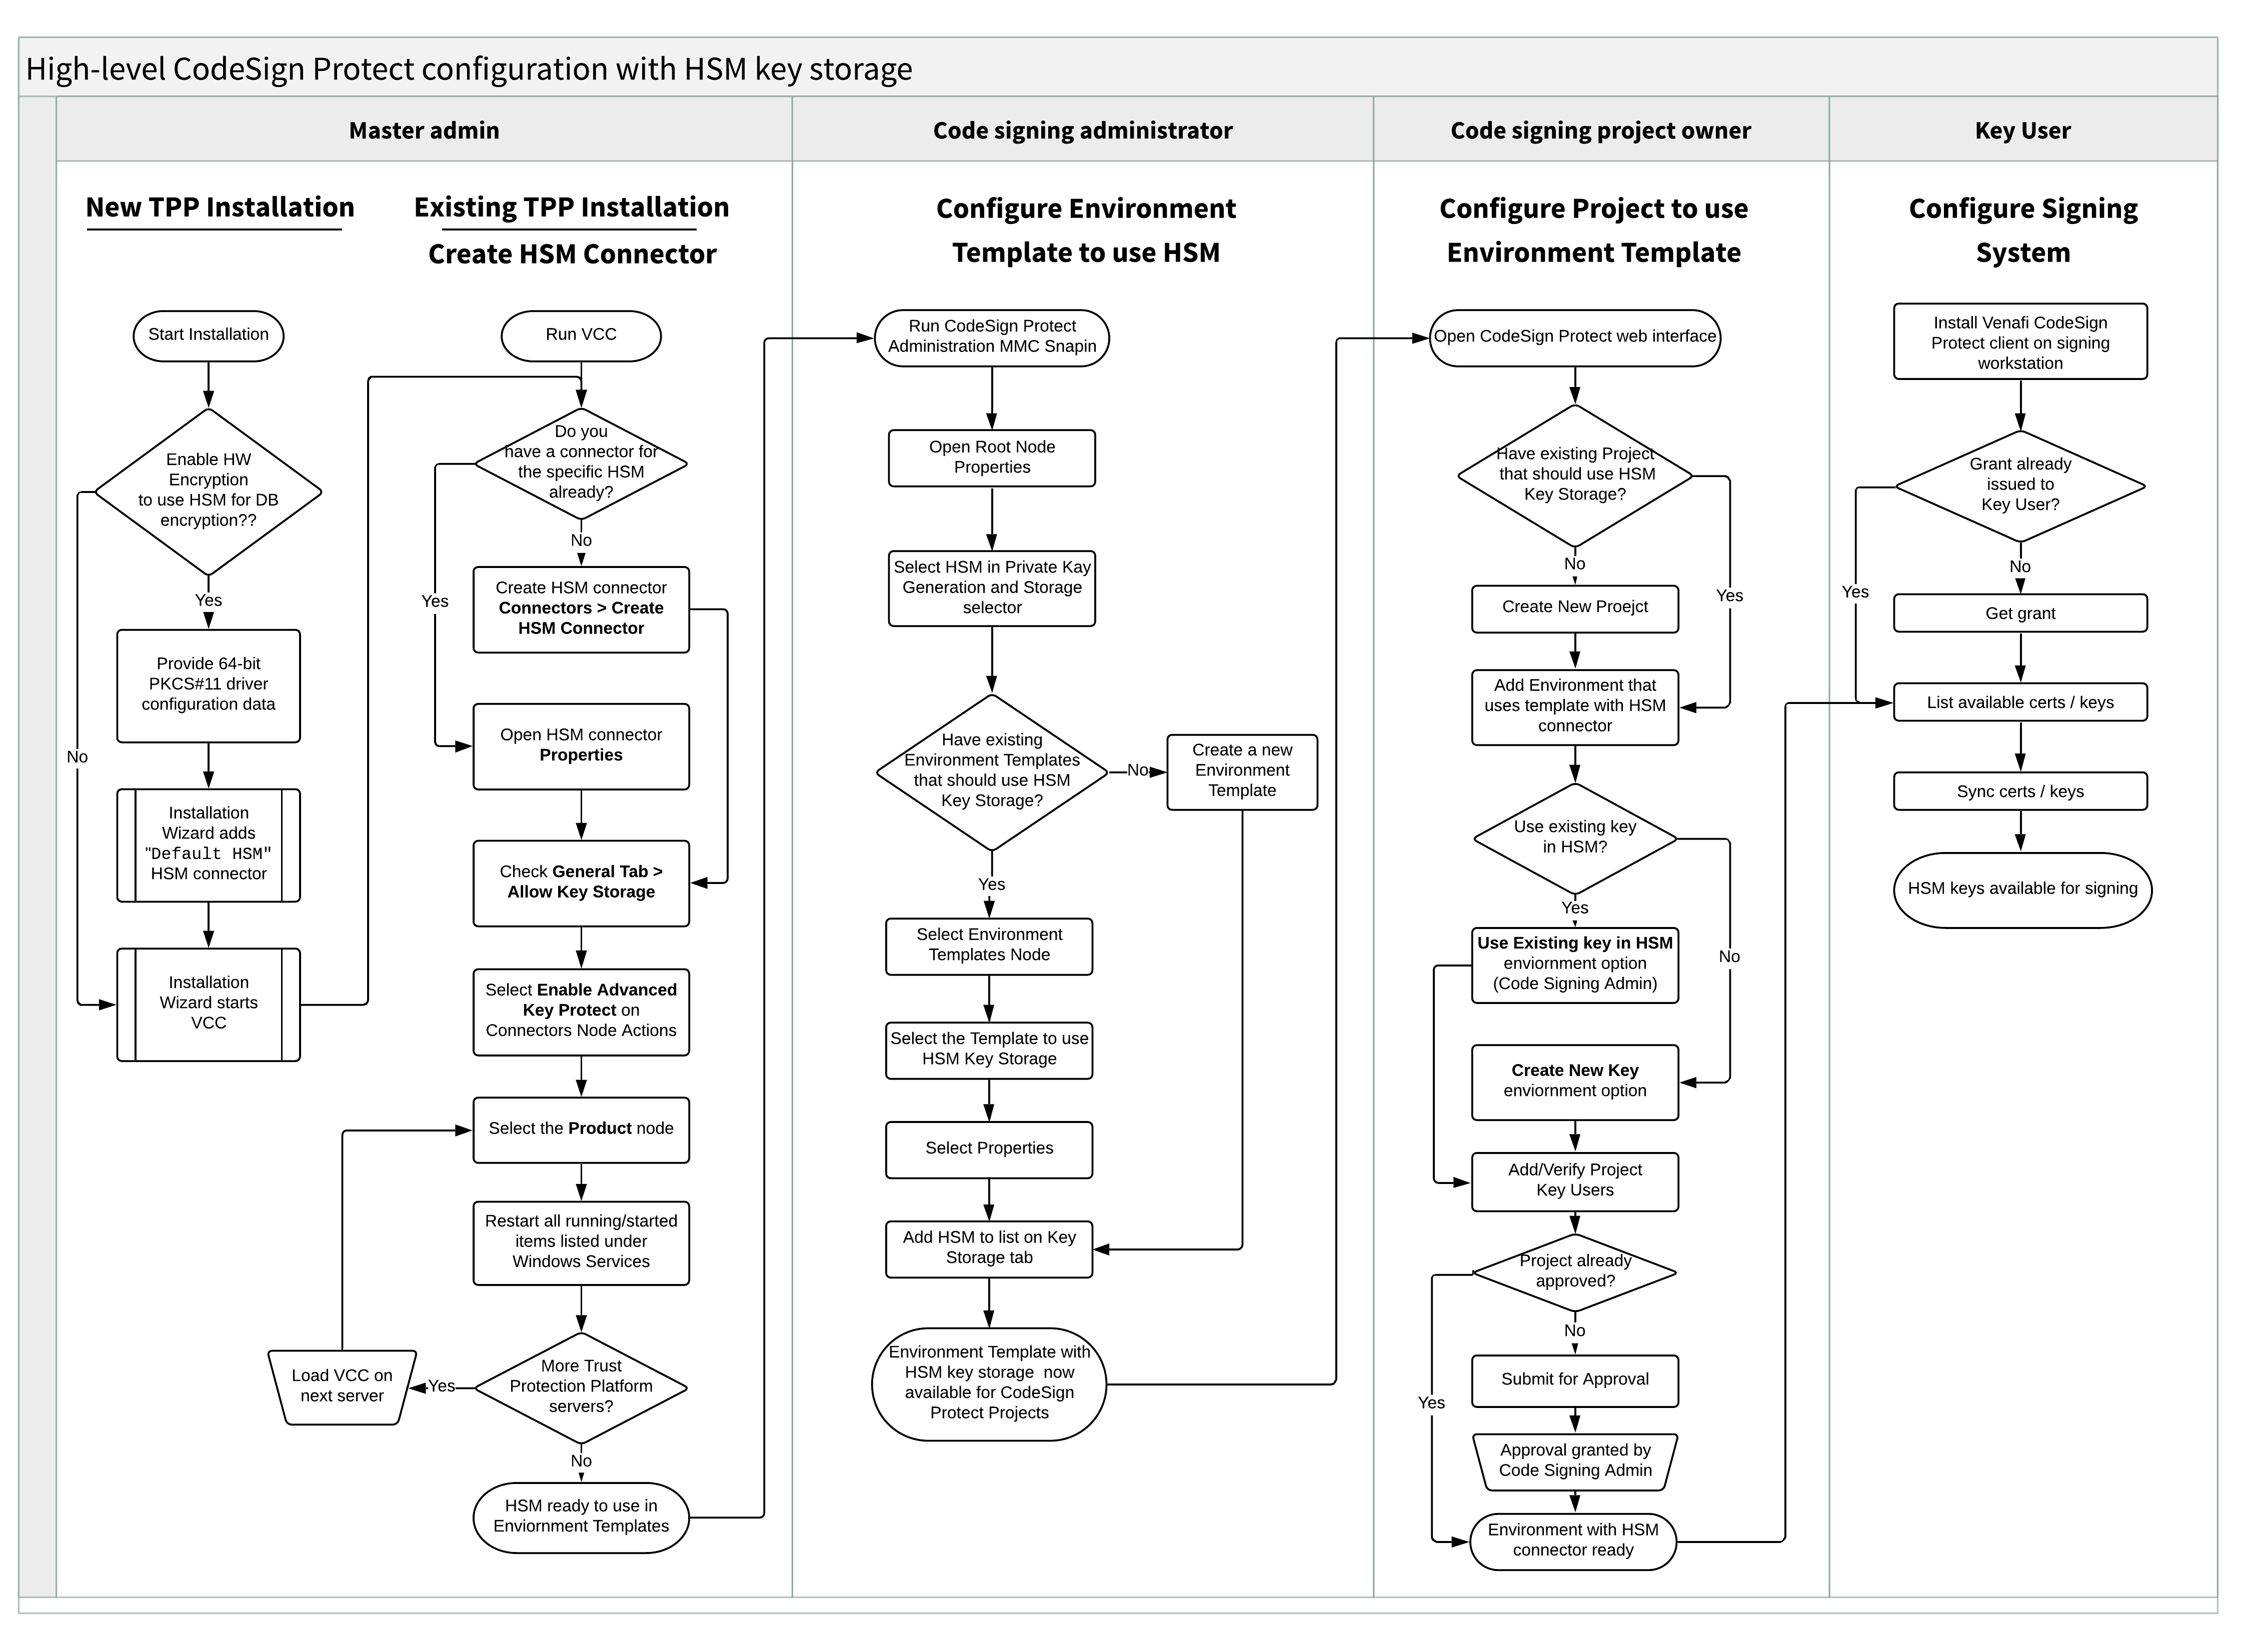
This table summarizes the high-level tasks, who performs them, and what their inputs and outputs are.
| High-level task | Role | To begin, you'll need... | At the end, you'll have... | |
|---|---|---|---|---|
| 1 | Create an HSM Connector | Master Admin | Installed and running Trust Protection Foundation server with an installed and configured HSM client | HSM connections on the Trust Protection Foundation server. These connections are available to use in Code Sign Manager - Self-Hosted environment templates |
| 2 | Configure environment template to use HSM connector | Code Signing Administrator | A Trust Protection Foundation server with HSM connectors | Code Sign Manager - Self-Hosted environment templates that use an HSM connector as a key storage location |
| 3 | Configure Code Sign Manager - Self-Hosted Project to use environment template | Project owner (or Code Signing Administrator if using pre-existing HSM keys) | Environment templates with an HSM connector as a key storage location | A Code Sign Manager - Self-Hosted project with environments that reference the HSM |
| 4 | Configure code signing systems | Key users | A Code Sign Manager - Self-Hosted project that includes one or more environments that use HSM key storage and specify the user in the key user role | Synced code signing certificates or keys, with the associated private keys on the HSM. |
| 5 | Sign code | Key user | Code signing certificates and keys that are synced with Code Sign Manager - Self-Hosted |
Code signed with private key on HSM |
Create an HSM connector
First things first
You'll need to log on to the Trust Protection Foundation server as a Master Admin server to complete these steps.
Tasks to create an HSM connector
Step 1: Connect your HSM to the Windows server
To get started, you'll need to establish a connection between the HSM and the Windows server that hosts Trust Protection Foundation. Since each HSM is different, you'll need to rely on your HSM vendor's documentation for steps on creating this connection.
NOTE Trust Protection Foundation requires the HSM vendor's PKCS#11 library in order to communicate with the HSM. This library is usually available as an installation option, so make sure to select that option, and the note the name of that library. You'll need it later.
Once this connection is made, Trust Protection Foundation can be configured to recognize this connection
Step 2: Create the HSM connector on Trust Protection Foundation
Now that the HSM is connected to the Windows server, you can set up an HSM connector in Trust Protection Foundation. This section walks you through how to create that connection.
NOTE These steps show how to create an HSM connector after initial Trust Protection Foundation configuration. If you configured Trust Protection Foundation to use hardware encryption during initial configuration, then you already have an HSM connector called Default HSM, and you can use that HSM with Code Sign Manager - Self-Hosted.
If you want to use Default HSM, go to the Connectors node in CyberArk Configuration Console, open the Properties for Default HSM, and check the Allow Key Storage box. Then proceed to Step 3: Enable Advanced Key Protect.
To create a new connector, follow these steps:
- Sign in to the Trust Protection Foundation server and open CyberArk Configuration Console.
- In the navigation panel on the left, click Connectors.
- In the Actions panel in the right, click Create HSM Connector. You may be asked to sign in with your local master admin credentials.
-
Complete the fields in the HSM Connector according to the following guidelines:
Field
Description
Name
Name of the HSM connector. This name will be how Code Signing Administrators identify this HSM connector when they are creating environment templates. In this example, we'll name it Code Signing HSM.
Cryptoki DLL Path
Trust Protection Foundation requires access to the 64-bit version of Cryptoki DLL.
For SafeNet Luna SA devices, this is the path to the
cryptoki.dllfile.For Entrust nShield Connect HSM devices, this is the path to the
cknfast.dllfile.After selecting the DLL, click Load Slots. Trust Protection Foundation will query the HSM and return the available slots.
IMPORTANT Trust Protection Foundation requires the path to the DLL file to initialize the connection to the HSM device. This path will be used for all Trust Protection Foundation servers in the cluster (connected to the same database). All servers in the cluster must have their DLL file in the same location.
Slot
Slot ID for the HSM partition where you want Trust Protection Foundation to access the encryption keys.
NOTE While slot numbers are listed in the drop-down list, Trust Protection Foundation does not depend on slot numbers. Trust Protection Foundation identifies HSM partitions by label first, and in the case that there are duplicate labels, it falls back to the serial number.
User Type
User type required to access the HSM keys on the designated partition (Slot ID).
The designated User Type must have sufficient permissions to use the keys in the Encryption Driver’s Permitted Keys list.
Pin
Pin, if one is required to access the HSM.
If you use Entrust nShield token protection, leave the field empty.
If you are setting up AWS CloudHSM, the pin must be in the following format:
<CU_user_name>:<password>.(button)
If you want to generate a new AES 256-bit symmetric key on the HSM, click this button. A new key will be generated.
-
Click Verify. Trust Protection Foundation will attempt to connect to the HSM.
NOTE This may take a couple of minutes.
-
If the connection is successful, you'll see a Permitted Keys box and an Allow Key Storage checkbox.
For the purposes of this procedure, don't select anything in Permitted Keys, but do select the Allow Key Storage checkbox.
NOTE The keys shown in the Permitted Keys box are keys available for data encryption purposes
The Allow Key Storage checkbox enables this HSM connector to store
At this point, your HSM connector dialog should look something like this:
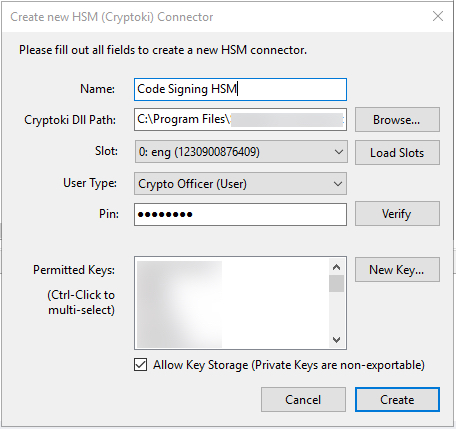
- Click Create.
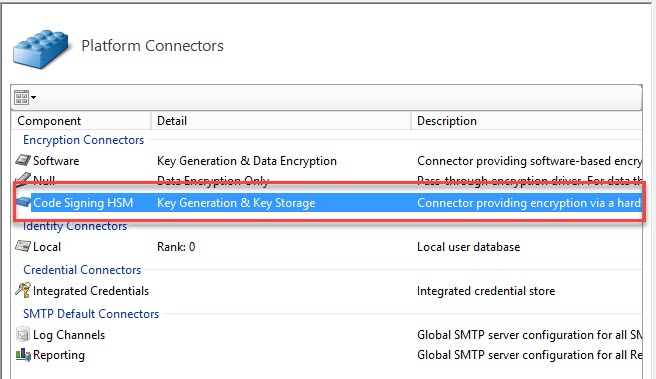
The HSM connector is now created, and you'll see it listed in under the Encryption Connectors section of the Platform Connectors page.
If you want to create more HSM connectors, just repeat these steps.
Step 3: Enable Advanced Key Protect
If Advanced Key Protect is not yet enabled, you'll need to enable it. In the Connectors node of CyberArk Configuration Console, click Enable Advanced Key Protect.
Step 4: Restart Services
Click the Product node in CyberArk Configuration Console left navigation pane. In the Windows Services section in the center pane, restart any services that are currently in the Running or Started state. To do this, click the service to highlight it, and then click Restart in the Actions pane in the right.
You'll need to restart the services for each Trust Protection Foundation server connected to the database.
Configure environment template to use HSM connector
First things first
- This step can be performed either by the master admin or by a Code Signing Administrator. To assign a Code Signing Administrator, go to the System Roles node in CyberArk Configuration Console, and select Add Code Signing Administrator in the Actions panel on the right.
- Configuring environment templates can be done using the Code Signing Administration MMC snap-in, so the Code Signing Administrator doesn't have to be signed into the Trust Protection Foundation server to create templates.
Tasks to create an environment template
Step 1: Enable the HSM connector in Global Code Signing Configuration
-
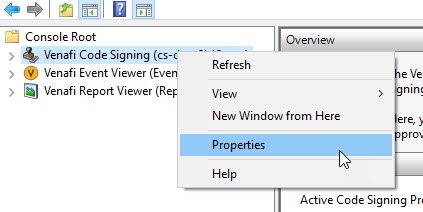
Right-click the Code Signing node (in either the Code Signing Administration MMC Snap-in or CyberArk Configuration Console), and then select Properties.
-
In the Global Code Signing Configuration tab, there is a section called Private Key Generation and Storage. From here, you'll see the HSM connectors your Master Admin created previously. Check the locations you want to allow for key generation and storage. In this example, we'll select Code Signing HSM and Software.
DID YOU KNOW? The Software location refers to the Trust Protection Foundation software Secret Store.
- If you want to set other global configuration options, you can do that now.
- Click OK. The HSM connectors are now available for use in environment templates.
Step 2: Select the HSM on Key Storage tab in environment templates
For any new or existing environment template, you can now select the HSM from the Key Storage Location tab.
NOTE Since the focus of this article is on creating the HSM connection, not all of the options for environment templates are explained here. For instructions on creating new environment templates, or to learn more details about the other tabs, see Create Environment Templates.
Also, not all environment templates have the same tabs, so your screen may look different than the example below.
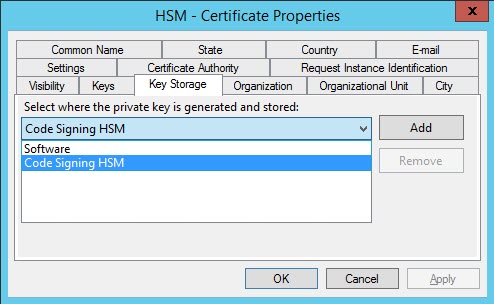
Select the HSM, and then click Add.
DID YOU KNOW? If the Key Storage list has only one location listed, then that location will be used in all environments that use this template. If it has more than one, then the Project Owner will be allowed to select which location to use when configuring environments.
Configure Code Sign Manager - Self-Hosted Project to use environment template
First things first
- Project Owners will be able to configure environments to generate new keys using the HSM connector.
- Code Signing Administrators have the ability to create new environments that use existing HSM keys, so if you want to use an existing key, a Code Signing Administrator will need to create the environment.
Tasks to configure an environment
Step 1: Add a new environment to a project
- Sign in to Code Sign Manager - Self-Hosted project interface by going to https://tpp-server-url/aperture/codesign in a web browser.
-
In the menu bar, click Projects.
If you already have a Project that you want to add an environment to, select that project. If not, see the steps for creating new projects.
- In the Project screen, click the Environments tab.
-
Click Add Environment, and then select the type of environment you want to add.
NOTE The environment type you choose will only allow environment templates of the same type. For example, if the Code Signing Administrator added the HSM connector to a Certificate & Key environment template, then you'll need to select a Certificate & Key environment in this step to see that template.
- After selecting an environment type, a modal will open that includes a drop-down to select an Environment Template. From here, select the template that the Code Signing Administrator assigned the HSM as a Key Location to.
- To complete environment configuration, follow the steps in the Creating Code Sign Manager - Self-Hosted Projects section of Creating Code Sign Manager - Self-Hosted Projects.
Step 2: Verify the Users & Roles on the project
Anyone that needs to sign code using this environment must be listed as a Key User on the project (or be a member of a group this given Key User authority).
- On the Project screen, click Properties.
-
In the Users & Approvers section, add the appropriate individuals or groups to the Key User field.
NOTE Users & Approvers are project level settings, so Key Users will be given access to the keys managed by all environments in the project.
Step 3: Save Project or Submit for Approval
If the project is already approved, you can simply save it by clicking Save.
If it's a new project, it needs to be approved before if can be used. Click Submit for Approval. The Code Signing Administrator will need to approve the project.
Configure code signing systems
Now that the project is set up with the Key User and the environment, the Key User can sync the keys and certificates with Code Sign Manager - Self-Hosted. Once synced, the code signing systems can use the HSM-hosted private keys to sign.
First things first
To complete these steps, you'll need the URL to your Trust Protection Foundation server and the credentials for a Key User on the project.
Install the CyberArk Code Sign Manager - Self-Hosted client
Code Signing clients can be installed on Windows, Linux, or macOS. If not already installed, follow the installation instructions.
Sync the keys and certificates
The method for syncing with Code Sign Manager - Self-Hosted depends on the type of environment that you want to sync with. From the list below, select what type of environment you are setting up, and then follow the configuration instructions on the signing system.
At the conclusion of client configuration, the HSM-hosted keys will be available on the client for signing.
Certificate & Key environments
- Setting up CyberArk CSP clients (Windows only)
- Setting up macOS Keychain clients (macOS only)
- Setting up PKCS#11 clients (Linux, Windows, macOS)
GPG enviornments
- Setting up GPG clients (Linux, Windows, macOS)
.NET
- Setting up .NET clients (Windows)
Sign code
After the certificates or public keys are synced to or advertised on the signing system, the associated private keys are available to use as if they were hosted on the signing system locally (though subject to the rules and restrictions placed on the use of the key by the Code Signing Administrator and Project Owner).
Refer to our sample integration guides for guidance on how to integrate with common code signing applications. See Integrating signing applications with Code Sign Manager - Self-Hosted.
Notes about deleting the HSM-stored key
When the time comes to delete an HSM-stored key, note the following:
-
Keys generated by Code Sign Manager - Self-Hosted, stored on the HSM, and linked to an Environment, will be deleted upon the purging of the Environment from the Recycle Bin.
Keys not generated by Code Sign Manager - Self-Hosted, which were linked to a Code Sign Manager - Self-Hosted Environment, will not be deleted when the Environment is purged.
-
The Certificate Age & Certificate History Recycle Bin tasks do apply to certificate objects associated to Code Sign Manager - Self-Hosted Environments.